Somehow, we ended up having two routers at home. The new one was a wireless N, the older one was a wireless G. To keep the speed on the wireless N network as fast as possible, I wanted all older laptops to connect to the wireless G router.
The problem was, with my initial setup, there were connection problems everywhere. Connecting from a laptop on the G network to laptop on N network worked. But not the other way around. Also, apple remote didn't work across the subnets.
I finally figured out how to solve the problem. Put them all on the same subnet! Here's how...
The trick is in the wiring between the two routers. And how DHCP is configured. See below...
Here are some more details, if you're interested:
Router1:
WAN IP: 10.1.1.2 (Depending on what ADSL modem wants you to use.)
WAN Subnet Mask: 255.255.255.0
LAN IP Address: 192.168.26.1
DHCP: Enabled
DHCP IP Address Range: 192.168.26.100 - 192.168.26.110
Router2:
WAN IP: 192.168.0.1 (Don't care. As long as it's not in the 192.168.26.* subnet)
WAN Subnet Mask: 255.255.255.0
LAN IP Address: 192.168.26.2
DHCP: Disabled
DHCP IP Address Range: N/A
Laptop on Wireless N:
IP Address: 192.168.26.101
Subnet Mask: 255.255.255.0
Default Gateway: 192.168.26.1
Laptop on Wireless G:
IP Address: 192.168.26.102
Subnet Mask: 255.255.255.0
Default Gateway: 192.168.26.1
I hope this helps. Enjoy!
Sunday, December 7, 2008
Saturday, November 8, 2008
AVG Invalid Update Control CTF File
I don't really know what happened. But this error just started coming up. Here's how to fix it:
1) Download this small program by Gary.
2) Important! Right-click, Run as Administrator.
3) Click OK when asked to delete corrupted update files.
I hope this helps. Enjoy!
Links:
Link1
Friday, October 17, 2008
Car Navigation Review: TomTom GO 930, GO 720, XL (30 series), Mio Moov 370
We were in search for a good GPS car navigation unit for use in Australia. Our three choices were: TomTom GO 930, TomTom GO 720, TomTom XL, and Mio Moov 370. Below is a review of what we liked and did not like about them.
Read on to know which model this is.
Photo taken 2008-10-17
TomTom GO 930:
+ I love the black rubber finish. Feels less fragile compared to other TomTom models.
+ Has the superset of features for TomTom units: TMC, Bluetooth, FM, other common features.
- Very expensive
Conclusion:
Simply put, if money was not a consideration, I would have gone for this model. I have yet to see any real negative reviews about it other than its price. Plus while holding it with my own hands, it really did feel very solid.
More reviews here:
TomTom GO 930 Review 1
TomTom GO 930 Review 2
TomTom GO 720:
+ Features: FM, Bluetooth
- Weak FM & Buggy bluetooth (So they claim)
- Pricey
- Forums report signal problems in Sydney CBD.
Conclusion:
The weak reviews and the price tag really did turn me off about this model. None of the features that distinguish it from XL or One XL seem to be any good. Furthermore, this old model seems to have an old GPS chip that is less sensitive compared to new models. My suggestion is to either go up for the 930, or go down for the XL.
More reviews here:
TomTom GO 720 Review 1
TomTom GO 720 Review 2
TomTom XL (30 Series):
+ Value for money
+ TMC ready if you want to buy bundle
- No FM, No Bluetooth
Conclusion:
This is the model that we eventually decided to go for. We like the feature set. We don't really need FM or Bluetooth. And the price is acceptable. Plus the 4.3" widescreen is just the correct size, I would say.
More reviews here:
TomTom XL Review 1
TomTom XL Review 2
Mio Moov 370
+ Solid Feature Set. Pretty much equivalent to TomTom GO 930.
- Community support base
Summary:
Other than the fact that I haven't actually seen this exact model yet, I was a bit worried about the having community support for the product. I preferred to have a unit that has more user, more people adding corrections, more people creating POI entries, more icons, more sounds, etc. If you're not really concerned about the community support issue, then I think it's a really impressive product.
More reviews here:
Mio Moov 370 Review
That's it for my review! I hope it helps. Now, if only we had our car already. =(
Wednesday, September 3, 2008
Google Chrome does not support ICC color profiles?
After the announcement two days ago, I was really looking forward to Chrome. Unfortunately, it seems to be missing on one of my most loved new feature of Firefox 3: support for color profiles.
See my post here and test it out for yourself.
Damn!
Saturday, July 26, 2008
Control multiple computers with one keyboard and mouse
If you're geekozoid like me, you probably have more then one computer at home. And maybe even have them in a range of different operating systems. How do you control them from one source?
Well, there are plenty of options out there, like VNC, etc. But I just discovered one cool app: Synergy. I works for Windows, linux and mac. And best of all, it's free!
Check out my video below.
References:
* http://synergy2.sourceforge.net/
* PC World Magazine August 2008
Enjoy!
Well, there are plenty of options out there, like VNC, etc. But I just discovered one cool app: Synergy. I works for Windows, linux and mac. And best of all, it's free!
Check out my video below.
References:
* http://synergy2.sourceforge.net/
* PC World Magazine August 2008
Enjoy!
Monday, July 14, 2008
How to enable color profiles & color management in Firefox 3
Photographers and photo enthusiasts will be happy to hear this. Firefox 3 now supports color management. No more viewing flickr using Safari. You have to explicitly enable it though. Read on to know how.
Here is the link to the official test site for ICC v4. Go ahead and open it in a new window.
If your browser does not support color profiles or has it disabled, here is what you'll get:
If your browser does support color profiles, this is what you'll get:
Here is how to enable Color Management on Firefox 3:
1) Open Firefox 3 browser.
2) On the address bar type the following:
about:config
3) On the search bar type the following:
gfx.color_management.enabled
4) Confirm it is now set to true, then restart firefox.
That's it! Go back to the test site and confirm that you get the proper image.
Now, if only they had turned this on by default...
Enjoy!
Labels:
howtos,
linux,
photography,
windows vista,
windows xp
Saturday, July 12, 2008
Canon EOS 350D on Vista 64-bit.
As of time of posting this blog entry, Canon still does not support Vista x64. Here's a trick that I found to work:
1) Install 32-bit Vista drivers. You normally get the EOS Solution disk with your camera body. Just use those.
2) Here is the magical bit... On your camera, change the connection mode from PC Connection to Print/PTP.
3) Now connect your camera to your Vista x64 pc.
Voila! It works like magic. =)
Enjoy!
Friday, July 11, 2008
How to connect from a mac to a windows vista pc.
It looks like macs are not capable of the new networking protocol used by Windows Vista (smb/cifs). To get them to talk to each other, you will need to downgrade the vista machine to use the old protocol. Here's how to do it:
1) On the vista machine, click Start and type regedit
2) Navigate to \HKEY_LOCAL_MACHINE\SYSTEM\CurrentControlSet\Control\Lsa\
3) Change the property lmcompatibilitylevel from 3 to 1
4) Reboot
You should now be able to connect from your mac to the vista box. Enjoy!
1) On the vista machine, click Start and type regedit
2) Navigate to \HKEY_LOCAL_MACHINE\SYSTEM\CurrentControlSet\Control\Lsa\
3) Change the property lmcompatibilitylevel from 3 to 1
4) Reboot
You should now be able to connect from your mac to the vista box. Enjoy!
Wednesday, July 9, 2008
Vista Ultimate x32 on Dell 700M
CPU: 1.8 GHz Pentium M | |
Memory: 2GB | |
Graphics: Intel Extreme Graphics 855GM |
I just upgraded my laptop's memory to 2GB. (Which deserves a post in itself. To cut the story short, I didn't realize my laptop still uses DDR1. Anyway...) I'm hoping this is enough to run Vista. I'll be updating this post about how it goes.
What works out of the box:
1) HDD access
2) Graphics
3) LAN
4) Wireless
5) Touchpad
6) Special function keys: Brightness up/down, Volume up/down, Wireless on/off, CRT/LCD, Sound up/down, Printscreen, Eject, Standby
7) Monitor lid button
8) USB
What needed drivers:
1) Touch pad special functions. Get drivers from here.
What doesn't work (yet):
1) None found
What's not yet tested:
1) SD Card reader
Tuesday, July 8, 2008
Skype + Speed Tests
I just finished a few VOIP sessions with my parents and aunt in the Philippines. Skype was a bit flaky to Manila. The call to Angeles city was much better. I wonder where the problem was. Our house to Optus, Sydney to Philippines, Ph to Manila, Ph to Angeles city?
Well, here is the result of my speed test to Sydney:
And here's the test to Bayantel in Manila:
Anyway, I wonder if there's a standalone Skype landline phone I can install on my parent's home. So I can just call them up for free. They have broadband, but they rarely turn on their PCs.
References:
http://www.skype.com
http://www.speedtest.net
Hosts file on Windows
Yup! There is actually a hosts file on Windows. It does exactly the same thing as it does on Linux/Unix. And it can be found here:
C:\Windows\System32\drivers\etc\hosts
Note:
* You will need to open it as administrator if you want to edit it.
Enjoy!
C:\Windows\System32\drivers\etc\hosts
Note:
* You will need to open it as administrator if you want to edit it.
Enjoy!
Saturday, June 28, 2008
How to disable firefox session restore dialog
I know the session restore is a very useful feature. And a lot of people actually rely on it. But I find a bit annoying that it has to prompt me every time I start firefox.
I read somewhere that it is actually a bug in that firefox cannot distinguish between a machine shutdown and a crash. It thinks it crashed, an so prompts you if you want to continue off with the previously open windows that you had.
Anyway, until they get this fixed, I'm turning it off. Here's how to do it:
1) Open firefox and type the following in your address bar:
about:config
2) Right-click, and select:
New -> Boolean
3) In the dialog box, type the line below and press ok.
browser.sessionstore.resume_session
4) Set the value to:
false
You're done. Enjoy!
Monday, June 23, 2008
Use Winkey-E to start File Manager (Nautilus) on Ubuntu 8.04
I'm used to hittig Winkey-E to bring up Explorer on Windows. So, I want to have a similar key binding on Ubuntu. Here's how I did it:
Step 1: Disable current key binding of Winkey-E.
System->Preferences->Advanced Desktop Effects Settings
Go to Desktop->Expo->Bindings
Click on Super-E and disable it.
Step2: Add new bindings
prompt%> gconf-editor
Go to /Apps/metacity/global_keybidings
Set run_command_1 to < super >E (without any space)
Go to /Apps/metacity/keybinding_commands
Set command_1 to /usr/bin/nautilus
You're done. Enjoy!
Friday, June 20, 2008
killps - Pipe /bin/ps to /bin/kill
Have you ever wanted to kill a bunch of processes? Here is how to do it:
1) Put this in your .bashrc
2) Here's how to use it:
2.A) Search for the processes. Make sure you only see what you want to kill.
e.g.:
prompt%> ps -ef | grep program_name
e.g.:
ps -ef | grep username | grep program_name | grep -v grep
2.B) When you'r happy with the filter, pipe it to killps
e.g.:
prompt%> ps -ef | grep program_name | killps
e.g.:
ps -ef | grep username | grep program_name | grep -v grep | killps
Enjoy!
1) Put this in your .bashrc
# Killps - Marky 2008-06-20
# usage: ps -ef | grep progname | killps
alias killps="awk '// { print \$2 }' | xargs kill"
2) Here's how to use it:
2.A) Search for the processes. Make sure you only see what you want to kill.
e.g.:
prompt%> ps -ef | grep program_name
e.g.:
ps -ef | grep username | grep program_name | grep -v grep
2.B) When you'r happy with the filter, pipe it to killps
e.g.:
prompt%> ps -ef | grep program_name | killps
e.g.:
ps -ef | grep username | grep program_name | grep -v grep | killps
Enjoy!
Thursday, June 19, 2008
Google Toolbar for Firefox 3.
Finally, it's here! Get yours from:
http://www.google.com/tools/firefox/toolbar/FT3/intl/en/index.html
Enjoy!
http://www.google.com/tools/firefox/toolbar/FT3/intl/en/index.html
Enjoy!
Wednesday, June 18, 2008
How to fix weird characters in aterm (for viewing man pages)
If your aterm is showing you weird boxes when viewing man pages, just put the following in your .bashrc:
# Fix weird characters in aterm
export LANG=C
Enjoy!
# Fix weird characters in aterm
export LANG=C
Enjoy!
How to autostart emerald
There seem to be at least two ways to do this:
1) Add the following command to sessions:
emerald --replace &
2) Replace the following line in /usr/bin/compiz-decorator
from:
USE_EMERALD="no"
to
USE_EMERALD="yes"
Then, restart X server.
Enjoy!
1) Add the following command to sessions:
emerald --replace &
2) Replace the following line in /usr/bin/compiz-decorator
from:
USE_EMERALD="no"
to
USE_EMERALD="yes"
Then, restart X server.
Enjoy!
Sunday, June 15, 2008
Auto-complete hostnames with using bash
Having forever used tcsh, this is something new I discovered when I switched to bash.
Here's how it works:
prompt%>ssh my
becomes:
prompt%>ssh mypc.homelinux.org
Here's how to set it up:
1) Create a file similar to /etc/hosts
e.g: (/home/marke/hostfile)
* note: you don't really seem to need the real IP address. Just the name. You ca even shorten it if you have resolver set correctly.
2) Add the following to your .bashrc
Yor're done!
Enjoy!
For more info:
* man bash
* link
Here's how it works:
prompt%>ssh my
becomes:
prompt%>ssh mypc.homelinux.org
Here's how to set it up:
1) Create a file similar to /etc/hosts
e.g: (/home/marke/hostfile)
---snip---
# Local PC
127.0.0.1 localhost
127.0.1.1 mypc.homelinux.org
# Other
0.0.0.0 laptop1.homelinux.org
0.0.0.0 laptop2.homelinux.org
---snip---
* note: you don't really seem to need the real IP address. Just the name. You ca even shorten it if you have resolver set correctly.
2) Add the following to your .bashrc
export HOSTFILE="/home/marke/hostfile"
Yor're done!
Enjoy!
For more info:
* man bash
* link
How to disable tilde expansion on bash, Ubuntu 8.04 (hardy)
This is how to prevent bash from replacing "~" with "/home/" when you auto-complete using .
1) Edit .bashrc
prompt%> cd
prompt%> vi .bashrc
2) Add the following lines:
3) Try it out on a new terminal
For those interested, see: /etc/bash_completion Look for "tilde".
References:
* http://www.linuxquestions.org/questions/linux-software-2/how-to-stop-bash-from-replacing-with-homeusername-643162/
1) Edit .bashrc
prompt%> cd
prompt%> vi .bashrc
2) Add the following lines:
# Disable Tilde Expansion
_expand()
{
return 0;
}
3) Try it out on a new terminal
For those interested, see: /etc/bash_completion Look for "tilde".
References:
* http://www.linuxquestions.org/questions/linux-software-2/how-to-stop-bash-from-replacing-with-homeusername-643162/
Saturday, June 14, 2008
Ubuntu standard hotkeys I always forget
Actually, I only wanted to note down one. "Activate window menu". The hotkey for it is: ALT + Space. You then have access to the move command. This is particularly useful when your window just happens to slide under the menubar like this:
Update:
Alt-F7 Move Window
I'll add to this post as I forget & remember more hotkeys. :)
Enjoy!
References:
* http://vntutor.wordpress.com/2007/05/23/useful-hotkeys-in-ubuntu/
Update:
Alt-F7 Move Window
I'll add to this post as I forget & remember more hotkeys. :)
Enjoy!
References:
* http://vntutor.wordpress.com/2007/05/23/useful-hotkeys-in-ubuntu/
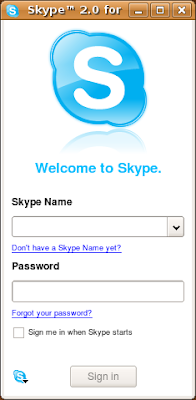
How to setup Skype on Ubuntu 8.04 Hardy on Asus P5K-E Wifi/AP
It took me some time to get this working. So I'm writing it down so I can go back to it in case I have to do it again. Here's how I got mine to work:
1) Edit sources.list
prompt%> sudo vi /etc/apt/sources.list
2) Add the following line:
deb http://download.skype.com/linux/repos/debian/ stable non-free
3) Update & install skype
prompt%> sudo apt-get update
prompt%> sudo apt-get install skype
4) If you encounter problems with libraries, do the following:
prompt%> sudo apt-get install -f
5) Run skype
prompt%> skype &
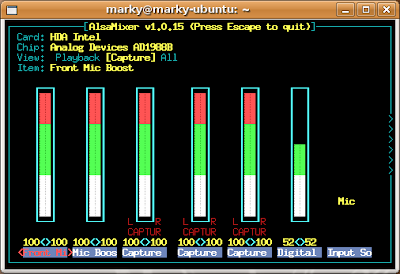
Now, the more difficult part is getting the mic to work. (Assuming you have no problems with audio playback). Luckily here are the tricks:
1) Go to System->Preferences->Sound. In the Devices tab->Sound Capture, select ALSA.
2) Open up a terminal, type the following:
prompt5> alsamixer -V capture
Now, make sure all Captures are set to CAPTUR. You can set/unset using the space key. Make sure input source is set to mic. Press ESC to quit.
3) Try recording from your mic using Applications->Sound & Video-> Sound Recorder. If that now works, you're looking good.
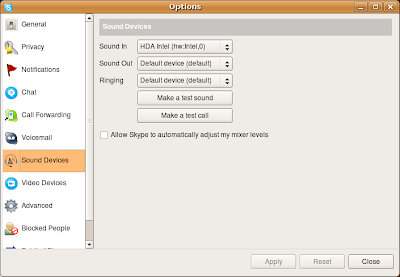
4) In Skype, go to Options->Sound Devices->Sound In. Select HDA Intel (hw:Intel,0)
5) In the same tab, uncheck Allow Skype to automatically adjust my mixer levels.
6) Now, try calling Echo123 (Sound Test Service)
Enjoy!
References:
* http://technical-itch.co.uk/2007/09/18/how-to-install-skype-on-ubuntu/
* http://forum.skype.com/index.php?showtopic=66544
* http://forum.skype.com/index.php?showtopic=126561&st=0&p=575491entry575491
* http://srimal-techdiary.blogspot.com/2008/05/using-mic-with-skype-2-on-ubuntu-8.html
Tuesday, June 10, 2008
Number pad / Numeric keypad not working in Ubuntu 8.04 (Hardy)
Sunday, June 8, 2008
CF Card Speeds
I hate it when you have to switch CF cards. It just always has to happen right when you're in middle of capturing those perfect frames. I think I need a slightly larger card. Perhaps 4GB or 8GB? Learning from experience, I also want a 120x or higher. 80x is just too slow. Below is my quick reference guide to CF card speeds.
References:
* http://en.wikipedia.org/wiki/CD-ROM#Transfer_rates
* My flickr pics here.
Transfer Speed: | MB/sec: |
1x | 0.15 |
20x | 3 |
80x | 12 |
100x | 15 |
120x | 18 |
133x | 19.95 |
150x | 22.5 |
200x | 30 |
300x | 45 |
400x | 60 |
500x | 75 |
References:
* http://en.wikipedia.org/wiki/CD-ROM#Transfer_rates
* My flickr pics here.
Friday, June 6, 2008
The best remote access system for Ubuntu 8.04 (hardy)
What is the fastest VNC server? What is the most responsive VNC client? Can I just forward X directly? Which is the most secure? - These are the questions I needed to get answers to quickly as migrated my development environment from XP to Linux.
The first obvious thing to try, of course, was directly forwarding X. That was just too slow. Next was VNC. I tried tightvnc, realvnc, vino, etc. The only usable setting I found was 8-bit colour and using Hextile encodig. However, it wasn't very enjoyable.
Then I discovered FreeNX. It's fast, secure, stable, user-friendly, and very pleasing to the eye. Here's how to set it up on Ubuntu 8.04.
Server Setup:
------------------------
Step1: Update your current installation
prompt%> sudo apt-get update && sudo apt-get upgrade
Step2: Add the repository for th NX packages & get them
prompt%> sudo vi /etc/apt/sources.list
Add the following lines:
deb http://ppa.launchpad.net/marceloshima/ubuntu hardy main
deb-src http://ppa.launchpad.net/marceloshima/ubuntu hardy main
Install:
prompt%> sudo apt-get install expect openssh-server nxlibs nxagent nxproxy freenx-server
Step3: Add your account
prompt%> sudo /usr/bin/nxserver --useradd < username > --system --administrator
Step4: Startup the NX server
prompt%> sudo /usr/bin/nxserver --start or --stop or --restart
Client setup
------------------------
Step1: Download the client
prompt%> wget http://64.34.161.181/download/3.2.0/Linux/nxclient_3.2.0-9_i386.deb
Step2: Install it
prompt%> sudo dpkg -i nxclient_3.2.0-9_i386.deb
If you are using a windows machine, you can get a client from here:
http://64.34.161.181/download/3.2.0/Windows/nxclient-3.2.0-10.exe
Step3: Run the client
prompt%> /usr/NX/bin/nxclient
Enjoy!
Update 2008-06-26:
For AMD64, its just about the same:
1) Get SSHD:
prmpt%> sudo apt-get install openssh-server
2) Get 3 packages from here.
3) Install:
prompt%> sudo dpkg -i nxclient_3.2.0-9_x86_64.deb
prompt%> sudo dpkg -i nxnode_3.2.0-11_x86_64.deb
prompt%> sudo dpkg -i nxserver_3.2.0-13_x86_64.deb
4) Start server
/usr/NX/bin/nxserver --status|--start|--stop|--restart
Enjoy!
References:
http://www.drtek.ca/freenx-server-ubuntu-hardy
Thursday, June 5, 2008
How to view man pages in color
The solution is basically to set the PAGER environment variable to the program that supports color.
There are at least 5 you can choose from:
* /bin/more
* /usr/bin/pg
* /usr/bin/less
* /usr/bin/w3m
* /usr/bin/most
To get "most" on Ubuntu, do the following:
prompt%> sudo apt-get install most
prompt%> sudo update-alternatives --config pager
Enjoy!
There are at least 5 you can choose from:
* /bin/more
* /usr/bin/pg
* /usr/bin/less
* /usr/bin/w3m
* /usr/bin/most
To get "most" on Ubuntu, do the following:
prompt%> sudo apt-get install most
prompt%> sudo update-alternatives --config pager
Enjoy!
Wednesday, June 4, 2008
GDM Welcome Theme Tutorial
Step1: Download an existing theme.
You can get one from here: http://www.gnome-look.org/?xcontentmode=150
Step2: Make your own background and foreground images.
Step3: Edit the *.xml file and *.desktop and put in your images.
Step4: Get xnest and get screenshot
* prompt%> sudo apt-get install xnest
* prompt%> gdmflexiserver --xnest
Step5: Tar it all up.
References:
http://live.gnome.org/GnomeArt/Tutorials/GdmThemes
Tuesday, June 3, 2008
Aptitude cheat sheet
Searching:
* apt-cache search ABC
* aptitude search ABC
Installing:
* sudo apt-get install ABC
* sudo aptitude install ABC
Showing version numbers:
* apt-cache show ABC
* aptitude show ABC
Uninstalling:
* sudo apt-get remove ABC
* sudo aptitude remove ABC
Removing configuration files as well:
* sudo apt-get remove --purge ABC
* sudo aptitude purge ABC
References:
* http://monkeyblog.org/ubuntu/installing/
How to install Firefox RC1 on Ubuntu Hardy (8.04)
Step1: System->Administration->software Sources
Step2: Add: deb http://ppa.launchpad.net/mozillateam/ubuntu hardy main universe
Step3: Press Close
Step4: Press Reload
Step5: prompt%> sudo apt-get update
Step2: Add: deb http://ppa.launchpad.net/mozillateam/ubuntu hardy main universe
Step3: Press Close
Step4: Press Reload
Step5: prompt%> sudo apt-get update
Monday, May 26, 2008
How to use Canon MP210 on Ubuntu 8.04 (Linux printer drivers setup tutorial)
This is how to get your MP210 printer to work on Ubuntu 8.04:
Step1: Get the drivers.
You will need 4 driver packages:
* cnijfilter-common_2.80-1_i386.deb
* cnijfilter-mp210series_2.80-1_i386.deb
* scangearmp-common_1.10-1_i386.deb
* scangearmp-mp210series_1.10-1_i386.deb
Get them from here:
http://support-au.canon.com.au/EN/search?v%3aproject=ABS-EN&binning-state=model%3d%3dPIXMA%20MP210%0Amenu%3d%3dDownload%0Aos%3d%3dLinux&
Step 2: Install the drivers
prompt%> sudo dpkg -i cnijfilter-common_2.80-1_i386.deb cnijfilter-mp210series_2.80-1_i386.deb
prompt%> sudo dpkg -i scangearmp-common_1.10-1_i386.deb scangearmp-mp210series_1.10-1_i386.deb
Step3: Add the printer (if not already added)
* System->Administration->Printing
* Remove MP210_series
* Add new printer
** Device URI hal:///org/freedesktop/Hal/devices/usb_device_4a9_1721_505BD0_if1_printer_noserial
Or do it via CUPS:
http://localhost:631/printers/
If you just need the printer, you're done!
Step4: Download drivers for scanner, Extract & Build
http://internap.dl.sourceforge.net/sourceforge/mp610linux/mp150-0.14.2u.tar.bz2
prompt%> tar jxvf mp150-0.14.2u.tar.bz2
prompt%> cd mp150-0.14.2u
prompt%> make
prompt%> sudo make install
Step5: Setup XSane
prompt%> sudo mv /usr/lib/sane/libsane-pixma.so.1.0.19 /usr/lib/sane/libsane-
pixma.so.1.0.19.old
prompt%> sudo cp libsane-pixma.so /usr/lib/sane/libsane-pixma.so.1.0.19
prompt%> sudo apt-get install xsane
Step6: Run XSane
Click Applications->Graphics->XSane Image Scanner and scan away.
Enjoy!
References:
link1
Sunday, May 25, 2008
How to enable vim syntax highlighting on ubuntu 8.04
Problem:
vim has no syntax highlighting on ubuntu 8.04.
Additional symptoms:
Solution:
Step1: Install the full version of vim:
Step2-A: Edit system-wide settings to enable syntax highlighting.
Remove the double-quote on the "syntax on" line
OR
Step2-B: Make changes only for your account.
Remove the double-quote on the "syntax on" line
All done! Enjoy!
vim has no syntax highlighting on ubuntu 8.04.
Additional symptoms:
Error detected while processing /home/marky/.vimrc:
line 21:
E319: Sorry, the command is not available in this version: syntax enable
Press ENTER or type command to continue
Solution:
Step1: Install the full version of vim:
prompt%> sudo apt-get install vim-full
Step2-A: Edit system-wide settings to enable syntax highlighting.
prompt%> sudo vi /etc/vim/vimrc
Remove the double-quote on the "syntax on" line
" Vim5 and later versions support syntax highlighting. Uncommenting the next
" line enables syntax highlighting by default.
syntax on
OR
Step2-B: Make changes only for your account.
prompt%> cp /etc/vim/vimrc ~/.vimrc
prompt%> vi ~/.vimrc
Remove the double-quote on the "syntax on" line
" Vim5 and later versions support syntax highlighting. Uncommenting the next
" line enables syntax highlighting by default.
syntax on
All done! Enjoy!
Sunday, April 6, 2008
Dell System Restore (PC-Restore by Symantec)
This blog is really for me more than anybody else. It's where I write down things I frequently have to go back to. This one's for my Dell 700m laptop. The only thing I really want to note down is: CTRL-F11
Links:
http://www.goodells.net/dellrestore/fixes.htm
http://support.dell.com/support/topics/global.aspx/support/dsn/document?c=us&l=en&s=gen&docid=3E48AE3870775D64E040A68F5B2877D4&journalid=4A21D63B811197CBE040A68F27286213&Query=&SystemID=&ServiceTag=&contenttype=&os=&component=&lang=&doclang=&toggle=&dl=
Saturday, April 5, 2008
Camel Caps Title and Artist in iTunes
I DON'T LIKE ALL CAPS LIKE THIS. I prefer my music titles to: "Use Camel Caps". And I'm tired to renaming each of the 1000 Top Songs Of The 80's. Here is my solution:
1) Save the snippet below into: MarkyCamelCapsSelectedSongs.js
2) Open iTunes and select the songs you want to convert.
3) Double click MarkyCamelCapsSelectedSongs.js from explorer to run it.
You should see your selected songs get converted.
More Info here:
http://developer.apple.com/sdk/
http://www.nsc.ru/docs/ms/js/jstoc.htm
http://www.asp.dk/docs/jscript/jstutor.htm
Enjoy!
1) Save the snippet below into: MarkyCamelCapsSelectedSongs.js
// m_a_r_k_y@yahoo.com 2008-04-05 Initial
var iTunesApp = WScript.CreateObject("iTunes.Application");
var selectedTracks = iTunesApp.SelectedTracks;
var numTracks = selectedTracks.Count;
var ITTrackKindFile = 1;
while (numTracks > 0) {
var currTrack = selectedTracks .Item(numTracks);
// is this a file track?
if (currTrack.Kind == ITTrackKindFile) {
title = currTrack.Name;
artist = currTrack.Artist;
//WScript.Echo(convertToCamelCaps(title) + " : " + convertToCamelCaps(artist));
currTrack.Name = convertToCamelCaps(currTrack.Name);
currTrack.Artist = convertToCamelCaps(currTrack.Artist);
}
numTracks--;
}
// camelcaps string converter
function convertToCamelCaps(str) {
var tempArray = str.split(' ');
for (var i = 0; i < tempArray.length; i++) {
tempArray[i] = tempArray[i].charAt(0).toUpperCase() + tempArray[i].substring(1).toLowerCase();
}
return tempArray.join(' ');
}
2) Open iTunes and select the songs you want to convert.
3) Double click MarkyCamelCapsSelectedSongs.js from explorer to run it.
You should see your selected songs get converted.
More Info here:
http://developer.apple.com/sdk/
http://www.nsc.ru/docs/ms/js/jstoc.htm
http://www.asp.dk/docs/jscript/jstutor.htm
Enjoy!
Monday, March 31, 2008
Preserve MP3 Ratings across Windows Media Player (WMP) and Windows Explorer
This is how to preserve your MP3 ratings across Windows Media Player and Windows Explorer.
Step1: Add your MP3's into you library and add Star Ratings.
Step2: Check "Maintain my star ratings as global ratings in files" in Preferences.
Step3: Tools->Apply Media Information Changes.
Step4: Look at your files in Windows Explorer.
I hope this helps. Enjoy!
Step1: Add your MP3's into you library and add Star Ratings.
Step2: Check "Maintain my star ratings as global ratings in files" in Preferences.
Step3: Tools->Apply Media Information Changes.
Step4: Look at your files in Windows Explorer.
I hope this helps. Enjoy!
Wednesday, March 26, 2008
Color Management in Windows Vista
Here is a configuration that gives consistent colors in:
* Canon Digital Photo Professional
* Adobe Lightoom
* Adobe Photoshop CS2.
* Firefox 3 (new)
I'm not sure if it's all correct. But its something that seems to work for me.
Procedure:
Step 1: Disable Adobe Gamma Loader.
Step 2:
Run Windows "Color Management" application.
Set the System Default by going to the "Advanced" tab, and clicking "Change System Default". Then set the following settings below.
Step 3: Set the user color management.
To enable color management in Firefox 3, see my other post
How to enable color profiles & color management in Firefox 3
I hope this helps! Let me know if you other suggestions.
Thanks! Enjoy!
Tuesday, March 25, 2008
Overclock the Q6600 on P5K-E Wifi/AP and Corsair DDR2 800
Hardware:
CPU: Q6600 2.4Ghz
Memory: AData 2x1GB DDR2, Corsair 2x2GB DDR2 5-5-5-15
Motherboard: Asus P5K-E Wifi/AP
CPU Cooler: Coolermaster Hyper TX 775
Max overclock achieved:
3.2GHz
CPU Multiplier: 8x
FSB: 356MHz
DRAM freq: 800MHz
Problem: System hit 75ºC as soon as I started the test.
Safe overclock:
2.6GHz
CPU Multiplier: 9x
FSB: 288MHz
FSB strap to north bridge: 266MHz
DRAM freq: 864MHz
For the best article I found for overclocking, click here.
Tuesday, February 19, 2008
And the winner is... Blue Ray!
So, it looks like the high definition format war has ended. To be honest, I'm not really that much affected. But it is nice to know that I'm sure to get compatibility when I do buy that HD player and that wide screen TV in the future (*dreaming*).
Anyway, here is a blow-by-blow of the battle that took place: http://www.pcworld.com/article/id,142584-pg,1/article.html
Enjoy!
Anyway, here is a blow-by-blow of the battle that took place: http://www.pcworld.com/article/id,142584-pg,1/article.html
Enjoy!
Sunday, February 3, 2008
Microsoft + Yahoo = Microhoo(?) Yahoosoft(?)
I don't usually blog about these type of items, but this one sounds quite interesting. It has been rumored about for some time. Now it seems to be coming true.
Microsoft has just offered to buy Yahoo! for $44.6 billion. Read Steve Balmer's letter to the Yahoo! board here.
I personally don't see much good coming out of this. Especially since I'm heavily using Yahoo services such as Yahoo Mail and Flickr. I don't think I want Microsoft to be messing with these services.
Oh well, who knows? This might just turn out to be good for us. We'll have to wait and see.
Tuesday, January 15, 2008
A better defrag program for Windows Vista
Ok, so you're not too happy about the new disk defragmenter that comes with Vista.
Well, try this for a change.You can download it from www.auslogics.com.
It gives you a better view of what is happening while it's running. And it seems to do a decent job. Finally, the best thing is, its absolutely FREE!
Enjoy!
Well, try this for a change.You can download it from www.auslogics.com.
It gives you a better view of what is happening while it's running. And it seems to do a decent job. Finally, the best thing is, its absolutely FREE!
Enjoy!
Fix your Home and End keys in mac OSX
Are you missing the Home and End keys? You can get them working using KeyFixer. As of posting of this entry, the latest can be found here.
Enjoy!
Monday, January 14, 2008
OSX Leopard on Intel x86
Have you ever wanted to run OSX on you PC? Hehehe! Now you can!
Here are the things you need to do:
Enjoy!
Here are the things you need to do:
- Get a copy of OSX from you favorite torrent site.
e.g. osx86 Leopard flat image (install mac os x 10 5 from windows) - Extract leopard-x86-flat-img.
- Free up a harddisk. You will need an empty disk, not just a partition. Using Windows Disk Manager, remove any partitions from the disk.
- From a terminal, use "dd --list" to list up drives in your system.
- Now, invoke one of the scripts for the appropriate harddisk you want to write the OSX image to. Warning! If you make a mistake, you will mess up your system and data files. So, be careful.
- Reboot and change BIOS settings to boot from the harddisk with OSX.
- Now boot into your Hackintosh! =)
- If you have an ASUS P5K-E WIFI board, you will need the p5ke_leopard.zip patch to get the LAN and audio working. To get the wireless to work, get the RTL8187L drivers.
- ASUS P5K-E Wifi
- AData 2GB DDR2
- Intel Q6600 2.4GHz Quad Core
- 250 GB Samsung IDE (for OSX boot)
- Gigabyte 640MB 8800GTS
Enjoy!
Thursday, January 10, 2008
Sunday, January 6, 2008
LAN Cable Wiring - Straight & Crossed
This information is freely available on the web, but I've decided to put it here for my own use so that I don't have to keep looking for it every time.
That's all there is to it. Enjoy!
Note:
I got the illustrations from here, then modified using them Photoshop to look nicer and be more understandable.
How to hold and read pin numbers
You should hold the jack with the terminals on top and the clip at the back.
Wiring for Straight cable
Use this type of wiring for connecting PC-to-HUB. Use the same wiring for both ends of the cable. (i.e. They should be identical to each other if you place them side by side.) You can choose between A-type or B-type. But make sure to use the same for both ends of your cable.
Wiring for Crossed cable
Use this type if wiring if you want direct PC-to-PC connection or Hub-to-Hub. As with the previous, you choose either the A-type or the B-type. Again, make sure you use the same type for both ends of the cable.
That's all there is to it. Enjoy!
Note:
I got the illustrations from here, then modified using them Photoshop to look nicer and be more understandable.
Saturday, January 5, 2008
How to Change or Add Nero 8 Serial Number
If Nero complains that you have a pirated serial number (which is probably correct), do the following:
Delete the file called NeroPatentActivation.exe from "C:\Program Files\Common Files\Nero\Shared\NL3".
Open Nero Control Center by clicking:
Start->All Programs->Nero 8->Nero Toolkit->Nero ControlCenter
Click on Updates tab on the left panel. Uncheck the box that says: "Check for updates every: XXX days"
Click on License tab on the left panel. Then click on Add and add your serial numbers.
Your Nero 8 should now work and be activated permanently.
If this works for you, or if I missed a step, please let me know thanks!
Enjoy!
Subscribe to:
Posts (Atom)