Sunday, December 6, 2009

Show Desktop Quick Launch in Windows 7

Old habits die hard. I understand. So, for those who have gotten used to going to the bottom-left cornet of your desktop and clicking the "Show Desktop" quick launch icon for years, here is some help in your transition to Windows 7.

First of all, the new show desktop is now on the bottom-right corner of the screen. See screen cap below. Of course, I know that won't satisfy you. =) So keep reading.


If you want to get the old fashioned "Show Desktop" icon on the bottom-left, here are the instructions:

Step 1:
Using notepad, create a file named "desktop.scf" with the contents below:

[Shell]
Command=2
IconFile=explorer.exe,3
[Taskbar]
Command=ToggleDesktop

In the Save dialog, select "All Files (*.*)" as file type. Then, save it to: "C:\Users\%USERNAME%\AppData\Roaming\Microsoft\Internet Explorer\Quick Launch\User Pinned\TaskBar".

Step 2:
Duplicate a shortcut on your desktop. Just do this using copy-paste. (I'm using Zoom Browser on my example. But you can use any other program.) Go to the shortcut properties and change the comment, name, and icon to your preferred icon. (You can use explorer.exe for the desktop icon.) Now, pin the shortcut you just created onto the taskbar.


Step 3:
Right-click on your new launcher, then right-click again onto the icon itself and bring up its properties. On the shortcut tab, change the Target to desktop.scf you created in Step 1. Click OK, and your done!


I hope this helps. Enjoy!

References:
Link1

Monday, August 31, 2009

The best iPhone bike mount

I recently (re)started on a new hobby: road biking. And given that I never go anywhere without my iPhone, of course I had to find a way to make most use of it on my bike.

I've been trying for days to find a decent bike mount (on ebay) but couldn't find one. So, I decided to make my own.

Components:
1) Broken iPhone leather case - Broke the top frame while pulling it out of my pocket. Happy I decided to keep it for a while.
2) Zip ties
3) (Optional) 1 cm diameter tube. I got this from a broken RC heli tail boom.


Tools:
1) Cutting knife
2) (Optional) Drill. I used a dremel rotary tool.

Steps:
1) Cut two holes into leather case. The distance between the holes should be the same as the width of your bike stem (one that attaches your handle bar).
2) (Optional) Cut the tube to your preferred length. Drill two holes of the same distance as your holes on the iPhone case.
3) Put it all together with zip ties.

Result:
(Click on pictures to enlarge.)


Hehehe! All of this from junk parts. Not bad eh?

Note:
Was worried it would still pop out, so I wrapped 1 rubber band around it. But, it may have been fine without it. Got 50 km with it on road and rough without any problems.

Enjoy!

Saturday, August 29, 2009

How to fix mouse not working after hibernate (USB device not recognized) on Windows 7

I've been having this problem since Vista. And, it's still happening on Windows 7. So, I decided to search around to find a solution. Here is the combined solution that worked for me:

1) Start Device Manager. This can be done (1) by right-clicking on My Computer and selecting Manage. Or (2) clicking the Start menu and typing device manager. Or (3) other ways.

2) Expand the Universal Serial Bus Controllers node.


3) For each instances of Generic USB Hub and USB Root Hub, right-click and go to Power Management tab.


4) Uncheck the option: Allow the computer to turn off this device to save power.

5) Repeat for ALL instances of Generic USB Hub and USB Root Hub.

6) Then, refresh everything by right-clicking and selecting Scan for Hardware Changes. Now, double-check all nodes you've changed and see if any has reverted back to the previous settings. On mine, one of the nodes kept resetting the power management. If this happens, just uncheck the box again and repeat the refresh until it sticks.

7) Retry sleeping or hibernating. It should now resume properly.


If that still doesn't work, you need to change some registry keys.

1) Open regedit. This can be done by clicking Start and typing regedit.

2) Navigate to HKEY_LOCAL_MACHINE\SYSTEM\CurrentControlSet\Services.

3) Add new key with name: USB

4) Add new DWORD Value. Name it: DisableSelectiveSuspend with value of 1.


5) Exit the registry editor.

6) Now try it again.

I hope this helps! Enjoy!

How to change location of special folders (My Documents, My Pictures, My Music, etc.) on Windows 7

Since the Windows 95 day, I've learned the habit of saving my profile data on a drive separate from the where the system is installed. This allows me to completely blow away (reformat) the OS without having to save my data everytime.

On Windows 7 (and Vista, if I remember correctly), this is made even simpler. Simply go to you profile folder where you see your special folders (My Documents, My Pictures, My Music, etc.).


Now, right-click on one of them and go to the location tab.

Browse to you new preferred location, and select Move.


You may have been prompted to merge the contents of you special folder. If you selected no, you may find that you will not have duplicate special folders. That's fine. Simply delete the one that points to the old one (the one on the system drive).

I hope this helps. Enjoy!

Thursday, August 27, 2009

How to remove/disable floppy drive on Windows 7

I don't think I've seen a physical floppy drive in years! But my system seems to still support it and even show it to me in the explorer window. Well, if you want to get rid if it, just follow the procedure below:

1) Open Device Manager. You can do this by clicking the start menu and typing device manager or by starting up devmgmt.msc.

2) Under your computer's name, look for the category named Floppy disk drives.

3) Right-click on the Floppy disk drive, and select disable.


That's it! You're done. No more annoying waits if you accidentally click it. And no more waste of screen real estate. Enjoy!

References:
  • reference 1
  • Saturday, August 1, 2009

    Enable emoticons (emoji) on iPhone 3.0


    Do you want to be able to send emoticons to your iPhone buddies? Here's how:

    1) Go to the App Store and look for the free app called: Spell Number.

    2) Start Spell Number and type the number blow, the hit return a few times. You can then close the application.


    3) Go to Settings->General->Keyboard, scroll down to Japanese, and enable Emoji.


    4) Now, go ahead and start typing. You can switch back and forth between your keyboards by pressing the internationalization button (Globe).


    If you have a Jailbroken iPhone, you may encounter some missing buttons like below. The left one is for switching, the right is the backspace key. They do work, but, no button is shown.


    Enjoy!

    References:
  • http://limitededitioniphone.com/emoji-activate-on-221-and-30-free/
  • Thursday, June 4, 2009

    How to run aptitute / apt-get via a proxy in Ubuntu Hardy and Jaunty

    I always have problems with this whenever I setup a new install. So, I decided to log it here.

    Add the following to your .bashrc:

    # -------------------------------------------------------------
    # Variables for apt-get
    export HTTP_PROXY="http://myproxy.mydomain.com:myportnumber/"
    export http_proxy="http://myproxy.mydomain.com:myportnumber/"
    export FTP_PROXY="http://myproxy.mydomain.com:myportnumber/"
    export ftp_proxy="http://myproxy.mydomain.com:myportnumber/"
    # -------------------------------------------------------------


    Enjoy!

    Saturday, May 23, 2009

    How to duplicate / clone virtual machine on VirtualBox

    To get around the limitations of VirtualBox's linear snapshots, what I decided to do was just clone the machine itself. Here's how to do it.


    VirtualBox doesn't really allow you to clone a machine. However, it does have a feature to clone a disk, which is pretty much the same thing. You can then easily use the disk to build the same machine.

    1) You need to merge the snapshots into the parent vdi file. To do this, turn off the machine. Open the Snapshot page of VirtualBox. If you want to include the current state, make a sapshot for it. Then, for each snapshot, select "Discard" snapshot. This will merge the changes into the parent disk.

    2) Use VBoxManage.exe's clonevdi feature on the disk you want to duplicate

    C:\Program Files\Sun\xVM VirtualBox>VBoxManage.exe clonevdi "C:\Users\Marky\.VirtualBox\HardDisks\XP.vdi" "C:\Users\Marky\.VirtualBox\HardDisks\XPvideo.vdi"
    VirtualBox Command Line Management Interface Version 2.2.2
    (C) 2005-2009 Sun Microsystems, Inc.
    All rights reserved.

    0%...10%...20%...30%...40%...50%...60%...70%...80%...90%...100%
    Clone hard disk created in format 'VDI'. UUID: 8d143541-123e-4de0-ba2f-8f72b197a8f2


    3) In VirtualBox, create a new Virtual machine and point to the cloned hard disk.


    3) Start it up.
    That's it. You're done!

    References:
    Source
    Enjoy!

    Thursday, May 21, 2009

    Looking for VMware on Vista x64? Use VirtualBox!

    Well, I had my mind set on installing VMware and configuring a few virtual machines. So, I went ahead and downloaded the latest version of VMware server. After a long wait, to my disappointment, it wouldn't install! It doesn't look like VMWare supports Vista x64 as the host. Oh well, forget it!


    After seeing a demo of VirtualBox during the Java Developer Day conference a few days ago, I decided to try it out. If it's as good as they claim, then maybe this could be my answer? And true enough, it supports Vista x64 as a host and it pretty much supports all operating systems as a guest. (Except OSX, I think. Hmm... we'll see about that. *wink*)

    So, I suggest you give it a try as an alternative to VMware. It's working well for me so far. Here is the link.

    Update 2009-05-22:
    Hmm... after giving it a good test, I don't think I'm very happy with VirtualBox. Switching from gui mode to text mode on a Linux guest seems to mess up the mouse pointer. A Vista x64 guest caused it to crash. I had to restart my pc to kill the Virtualbox process. And snapshots are so limited in functionality compared to VMware. I might actually give VMware another try. Perhaps I was just doing it wrong the first time. Oh well...


    Enjoy!

    Tuesday, May 19, 2009

    Ubuntu 9.04 Jaunty Jackalope

    Well, Ubuntu 9.04 Jaunty Jacklope was just recently released. And I'm just about to download it and give it a go. Please stay tuned. I will be adding a few more HOWTOs for problems & solutions I encounter.

    In the mean time, why don't you try it out for yourself as well? Here's the link.


    Enjoy!

    Learning heli loops on the Blade 400 3D

    Blade 400 RC Heli Accident

    I was trying to solve a problem with my gyro and tail servo. So, I decided to overhaul the heli. Unfortunately, I may not have secured the feathering shaft tight enough. The head assembly pretty much exploded in front of me and sent the blades flying at me at around 2000 RPM. Luckily, I was just about to land it, so it was very low. This could have been much worse! Phew! =)

    heli accident 1

    heli accident 2

    Tuesday, April 7, 2009

    How to enable / disable word wrap in vim

    To enable wrapping, type:
    :set wrap

    To disable wrapping:
    :set nowrap

    Easy! Enjoy!

    Sunday, April 5, 2009

    Trick to learning nose in hover on mode 2 transmitter.

    Here's a trick I came up with when I was learning to hover nose-in: "Just follow the heli with your stick."


    Confused? Here's the explanation. Start with a tail in hover, then just rotate it into the nose in position. The objective is to keep the heli perfectly still in front of you in this position. If it starts to drift towards you, it means the nose is dipping. The correct counter for that is to pull down on the elevator stick to make it move back (in this case away from you). The reverse is the same. If it starts to drift backwards away from you, it means the tail is dipping. The counter for that is to push the nose down by pushing the elevator forward to make the heli move forward (in this case towards you.) Got the logic? The same applies to the left and right.

    So, basically, the counter for any drift is to follow the heli with your stick. It's the same even if you have to apply it diagonally. I know it's counter-intuitive at first, but if you just follow the rules, you'll get a comfortable hover in no time.

    After a while, it all becomes automatic to you and you won't need to use this trick anymore. But in the mean time, for those who are just starting, I hope this helps. Good luck! Let me know how it goes. =)

    Friday, April 3, 2009

    Blade 400 DX6i Binding Instructions

    Start with both transmitter and receiver turned off.
    1) Attach bind plug to Rx (heli)
    2) Turn on the Rx (heli)
    --> Light blinking means bind mode.
    3) Move sticks & switches to fail-safe positions (Transmitter)
    4) Hold the bind button while turning on the transmitter.
    --> Tx & Rx should bind after a few seconds. Light on Rx will be solid.
    5) Remove the bind plug (heli)
    Power off and back on if you want.

    Monday, March 2, 2009

    Blade 400 ESC cut-off too early

    I hit this problem earlier using the factory setup of the blade 400. It took me a few batteries to figure out what was happening. Here are the symptoms, cause, and the solutions. Please note, this was only for my particular case. But it might be what is happening to yours too.

    Symptoms:
    1) ESC cuts off at around 2 minutes.
    2) Battery still half full according to charger.

    Cause:
    There's actually another symptom: ESC is very hot. As it turned out, my ESC was cutting off because it was too hot.

    Solutions:
    1) Mount ESC on the side for better ventilation. I think this helped, but this alone didn't really solve the problem.


    2) Reduce the drain from the motor. This was a combination of adjusting the throttle curve and the pitch curve. Please see my post about the setup here: E-Flite Blade 400 Beginner Setup for Hovering and Slow Forward Flight. (16 minutes of flight time!)

    With the two solutions above. I have no problems with early cut-off anymore.

    Other options you can try:
    1) Fly without the canopy.
    2) Replace the stock 25A ESC with one with higher rating. e.g. 35A

    I hope this helps. Enjoy!

    E-Flite Blade 400 - From A-to-B, Turn! Faster! ...Ahhhh! Crash!

    I've started getting bored with just hovering. So, this week I decided to attempt a little forward flight. Slowly at first but gradually getting faster. A feathering shaft, a pair of main blades, a main blade holder, and a horizontal tail fin holder later, I was starting to get the hang of it. Or so I thought...

    E-Flite Blade 400 - Learning Forward Flight & Left Hand Pivots

    Somehow, I find it more difficult to pivot counter-clockwise than clockwise. I'm really sure why. I think it has to do with the main rotor turning clockwise, and the tail rotor countering the torque. Hopefully, when I return to the faster head speed setup, it will more stable. Anyway, here's me practicing some forward flight and left hand pivots.

    Wednesday, February 25, 2009

    E-Flite Blade 400 Beginner Setup for Hovering and Slow Forward Flight. (16 minutes of flight time!)

    The following setup is a result of reading forums and a lot of my own experimentation. I recommend it for anyone who is learning to hover or learning slow forward flight. I recommend it be used for indoor flying only or outdoor on a very still day.
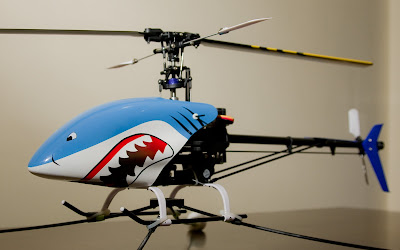
    Mechanical Setup
    I basically use the factory setup of the Blade 400. I currently use fiberglass blades. But I get the same results with the wooden blades. The only difference I can think of is lubrication.


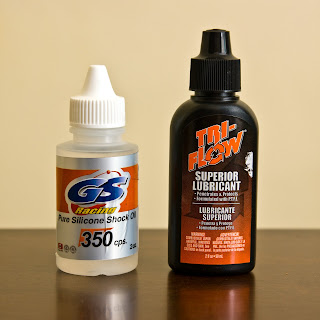
    For the belt, I use RC car shock oil. This was suggested in one of the forums. It's a bit messy sometimes, and I'm not really that sure if it helps, but I put it on my belt every dozen or so flights. The other recommended option is silicone spray.

    The next (not so) secret ingredient is Triflow. This definitely helps. I put it on all moving parts. The head setup, tail rotor, everything! It just works beautifully. It makes everything slide nice and smooth. It costs about AUD $8 for 2 fl oz. If you can't find this in your local hobby shop, try the bike shops. That's where I got mine.

    DX6i Throttle Curve
    I've decided to use F-mode for all my custom settings. This way, I can test how my settings compare against the default factory normal mode settings. Later, when I start doing 3D flying, I might swap them over completely.


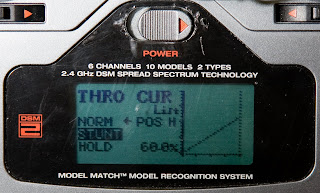
    I use a linear curve from 0 to 60%.

    That is:
    Position L = 0%
    Position 2 = 15%
    Position 3 = 30%
    Position 4 = 45%
    Position H = 60%

    The rationale is that the slower the head speed, the less power it will consume. Now, I've read in the forums that the motor runs most efficiently at 80% throttle. But I found this not to be the case on mine. I tried running a linear curve to 100% and 80%. Both gave me less flying time. I also tried running lower at 50%. But that barely got it off the ground. And it looked like the motor was being burdened too much by the pitch.

    With the 60% linear curve, it will allow you to hover at 1 line above mid-stick. Which I think is the ideal position in preparation for 3D flying.

    DX6i Pitch Curve
    I got the idea from one of the forums. But I added my own little adjustments. I am using the following settings:
    Position L = 35%
    Position 2 = 55%
    Position 3 = 70%
    Position 4 = 85%
    Position H = 100%


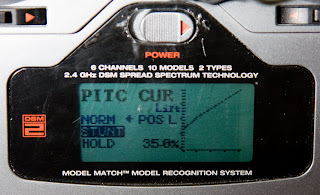
    The almost exponential-looking curve for 2,3,4,H, give you a very forgiving throttle/pitch response around mid-stick. With these values, you're sure the heli won't jump up or drop down even if you over-correct slightly. The lower Position L is my own addition. It gives you the negative pitch you need when you want to get the heli quickly to the ground. I didn't originally have this setting but found that during "emergencies" the heli just won't go down quick enough. With this, you still have good panic response. =)

    DX6i Dual Rates and Expo
    Again, I use F-mode for my custom settings. So, remember to turn on the switches when you program these in:
    AILE 100% +10%
    ELEV 100% +10%
    RUDD 100% INH


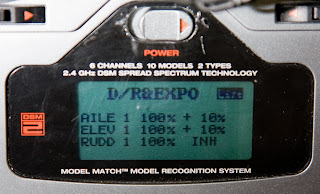
    The +10% expo makes the cyclics a bit more forgiving around the neutral position. At first, I didn't like these settings. Because the response felt delayed. I even tried negative expo. However, I found myself over-controlling too much. The heli didn't fly very nicely. With these settings it makes the heli fly like I'm in control. =)


    Well that's about it. Use the settings above, and you should get anything between 12 and 16 minutes of flying time. Remember to only use these indoor or outside on a windless day. Otherwise, the heli will just be too underpowered to be controllable in the wind. If you have any comments or suggestions, please feel free to leave me a message. I hope it helps. Enjoy!

    Tuesday, February 24, 2009

    E-Sky Lama V3 Flexible Tail

    The original tail is probably the most fragile part of the Lama V3. It broke on my very first flight (ahem, first crash, I should say). For the longest time, I've been repairing it with super glue. However, I think it has more glue than original plastic now. A few weeks ago, it just completely broke.


    Then I discovered the Xtreme Flexible tail. I ordered it on ebay for AUD $25 + shipping. And it hasn't broken since. It's probably the best upgrade you can get for this heli.


    Grab yourself one. Highly recommended. Enjoy!

    E-Flite Blade 400 Piro Floor

    E-Flite Blade 400 Learning Nose-In Hover

    Monday, February 9, 2009