Showing posts with label windows vista. Show all posts

Sunday, March 5, 2017

Thinking about assembling a new PC after 10 years

Hello! It's been a long time.

I'm writing this blog post from the machine I assembled 10 years ago. It's still alive and kicking as it has had it's share of upgrades throughout the years. But it's time for me to build a new one! Yehey!

Here is my current setup:
  • Intel Q6600 2.4GHz Quad Core (Passively watercooled with a Zalman Reserator)
  • MSI P5K-E Wifi motherboard
  • 8GB DDR2 memory
  • GeForce GTX 680 video card (Passively watercooled with a Zalman Reserator. Yes! Two of them in separate loops.)
  • Seasonic X650 (I think) 80 Plus Gold PSU
  • Vertex 3 256GB SSD 
  • Dell U3011 monitor
What I use it for:
  • Facebook (Of course!)
  • Web browsing / Work - Since most of my work is mostly over the web.
  • Light gaming (ahem!... Diablo 3, Civilization, This War Of Mine, XCOM)
  • Photo editing with Adobe Lightroom
What I want to build my next machine for:
  • VR gaming with HTC Vive
  • 1 or virtual machines for experimenting
  • Basically the same as before
And so the hunt begins! Stay tuned. :)

Saturday, May 23, 2009

How to duplicate / clone virtual machine on VirtualBox

To get around the limitations of VirtualBox's linear snapshots, what I decided to do was just clone the machine itself. Here's how to do it.


VirtualBox doesn't really allow you to clone a machine. However, it does have a feature to clone a disk, which is pretty much the same thing. You can then easily use the disk to build the same machine.

1) You need to merge the snapshots into the parent vdi file. To do this, turn off the machine. Open the Snapshot page of VirtualBox. If you want to include the current state, make a sapshot for it. Then, for each snapshot, select "Discard" snapshot. This will merge the changes into the parent disk.

2) Use VBoxManage.exe's clonevdi feature on the disk you want to duplicate

C:\Program Files\Sun\xVM VirtualBox>VBoxManage.exe clonevdi "C:\Users\Marky\.VirtualBox\HardDisks\XP.vdi" "C:\Users\Marky\.VirtualBox\HardDisks\XPvideo.vdi"
VirtualBox Command Line Management Interface Version 2.2.2
(C) 2005-2009 Sun Microsystems, Inc.
All rights reserved.

0%...10%...20%...30%...40%...50%...60%...70%...80%...90%...100%
Clone hard disk created in format 'VDI'. UUID: 8d143541-123e-4de0-ba2f-8f72b197a8f2


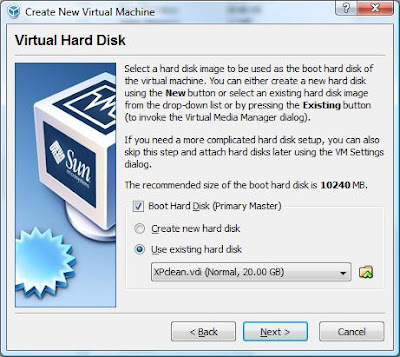
3) In VirtualBox, create a new Virtual machine and point to the cloned hard disk.


3) Start it up.
That's it. You're done!

References:
Source
Enjoy!

Thursday, May 21, 2009

Looking for VMware on Vista x64? Use VirtualBox!

Well, I had my mind set on installing VMware and configuring a few virtual machines. So, I went ahead and downloaded the latest version of VMware server. After a long wait, to my disappointment, it wouldn't install! It doesn't look like VMWare supports Vista x64 as the host. Oh well, forget it!


After seeing a demo of VirtualBox during the Java Developer Day conference a few days ago, I decided to try it out. If it's as good as they claim, then maybe this could be my answer? And true enough, it supports Vista x64 as a host and it pretty much supports all operating systems as a guest. (Except OSX, I think. Hmm... we'll see about that. *wink*)

So, I suggest you give it a try as an alternative to VMware. It's working well for me so far. Here is the link.

Update 2009-05-22:
Hmm... after giving it a good test, I don't think I'm very happy with VirtualBox. Switching from gui mode to text mode on a Linux guest seems to mess up the mouse pointer. A Vista x64 guest caused it to crash. I had to restart my pc to kill the Virtualbox process. And snapshots are so limited in functionality compared to VMware. I might actually give VMware another try. Perhaps I was just doing it wrong the first time. Oh well...


Enjoy!

Sunday, December 7, 2008

Two wireless networks on the same subnet

Somehow, we ended up having two routers at home. The new one was a wireless N, the older one was a wireless G. To keep the speed on the wireless N network as fast as possible, I wanted all older laptops to connect to the wireless G router.

The problem was, with my initial setup, there were connection problems everywhere. Connecting from a laptop on the G network to laptop on N network worked. But not the other way around. Also, apple remote didn't work across the subnets.

I finally figured out how to solve the problem. Put them all on the same subnet! Here's how...


The trick is in the wiring between the two routers. And how DHCP is configured. See below...


Here are some more details, if you're interested:

Router1:
WAN IP: 10.1.1.2 (Depending on what ADSL modem wants you to use.)
WAN Subnet Mask: 255.255.255.0
LAN IP Address: 192.168.26.1
DHCP: Enabled
DHCP IP Address Range: 192.168.26.100 - 192.168.26.110

Router2:
WAN IP: 192.168.0.1 (Don't care. As long as it's not in the 192.168.26.* subnet)
WAN Subnet Mask: 255.255.255.0
LAN IP Address: 192.168.26.2
DHCP: Disabled
DHCP IP Address Range: N/A

Laptop on Wireless N:
IP Address: 192.168.26.101
Subnet Mask: 255.255.255.0
Default Gateway: 192.168.26.1

Laptop on Wireless G:
IP Address: 192.168.26.102
Subnet Mask: 255.255.255.0
Default Gateway: 192.168.26.1

I hope this helps. Enjoy!

Saturday, November 8, 2008

AVG Invalid Update Control CTF File


I don't really know what happened. But this error just started coming up. Here's how to fix it:


1) Download this small program by Gary.
2) Important! Right-click, Run as Administrator.
3) Click OK when asked to delete corrupted update files.

I hope this helps. Enjoy!

Links:
Link1

Saturday, July 26, 2008

Control multiple computers with one keyboard and mouse

If you're geekozoid like me, you probably have more then one computer at home. And maybe even have them in a range of different operating systems. How do you control them from one source?

Well, there are plenty of options out there, like VNC, etc. But I just discovered one cool app: Synergy. I works for Windows, linux and mac. And best of all, it's free!

Check out my video below.


References:
* http://synergy2.sourceforge.net/
* PC World Magazine August 2008

Enjoy!

Monday, July 14, 2008

How to enable color profiles & color management in Firefox 3

Photographers and photo enthusiasts will be happy to hear this. Firefox 3 now supports color management. No more viewing flickr using Safari. You have to explicitly enable it though. Read on to know how.

Here is the link to the official test site for ICC v4. Go ahead and open it in a new window.

If your browser does not support color profiles or has it disabled, here is what you'll get:


If your browser does support color profiles, this is what you'll get:


Here is how to enable Color Management on Firefox 3:
1) Open Firefox 3 browser.
2) On the address bar type the following:

about:config

3) On the search bar type the following:

gfx.color_management.enabled

4) Confirm it is now set to true, then restart firefox.

That's it! Go back to the test site and confirm that you get the proper image.

Now, if only they had turned this on by default...

Enjoy!

Saturday, July 12, 2008

Canon EOS 350D on Vista 64-bit.

As of time of posting this blog entry, Canon still does not support Vista x64. Here's a trick that I found to work:

1) Install 32-bit Vista drivers. You normally get the EOS Solution disk with your camera body. Just use those.
2) Here is the magical bit... On your camera, change the connection mode from PC Connection to Print/PTP.
3) Now connect your camera to your Vista x64 pc.

Voila! It works like magic. =)

Enjoy!

Friday, July 11, 2008

How to connect from a mac to a windows vista pc.

It looks like macs are not capable of the new networking protocol used by Windows Vista (smb/cifs). To get them to talk to each other, you will need to downgrade the vista machine to use the old protocol. Here's how to do it:

1) On the vista machine, click Start and type regedit
2) Navigate to \HKEY_LOCAL_MACHINE\SYSTEM\CurrentControlSet\Control\Lsa\
3) Change the property lmcompatibilitylevel from 3 to 1
4) Reboot

You should now be able to connect from your mac to the vista box. Enjoy!

Wednesday, July 9, 2008

Vista Ultimate x32 on Dell 700M


CPU: 1.8 GHz Pentium M
Memory: 2GB
Graphics: Intel Extreme Graphics 855GM


I just upgraded my laptop's memory to 2GB. (Which deserves a post in itself. To cut the story short, I didn't realize my laptop still uses DDR1. Anyway...) I'm hoping this is enough to run Vista. I'll be updating this post about how it goes.

What works out of the box:
1) HDD access
2) Graphics
3) LAN
4) Wireless
5) Touchpad
6) Special function keys: Brightness up/down, Volume up/down, Wireless on/off, CRT/LCD, Sound up/down, Printscreen, Eject, Standby
7) Monitor lid button
8) USB


What needed drivers:
1) Touch pad special functions. Get drivers from here.

What doesn't work (yet):
1) None found

What's not yet tested:
1) SD Card reader

Tuesday, July 8, 2008

Hosts file on Windows

Yup! There is actually a hosts file on Windows. It does exactly the same thing as it does on Linux/Unix. And it can be found here:
C:\Windows\System32\drivers\etc\hosts

Note:
* You will need to open it as administrator if you want to edit it.

Enjoy!

Saturday, June 28, 2008

How to disable firefox session restore dialog

I know the session restore is a very useful feature. And a lot of people actually rely on it. But I find a bit annoying that it has to prompt me every time I start firefox.

I read somewhere that it is actually a bug in that firefox cannot distinguish between a machine shutdown and a crash. It thinks it crashed, an so prompts you if you want to continue off with the previously open windows that you had.

Anyway, until they get this fixed, I'm turning it off. Here's how to do it:

1) Open firefox and type the following in your address bar:
about:config

2) Right-click, and select:
New -> Boolean

3) In the dialog box, type the line below and press ok.
browser.sessionstore.resume_session

4) Set the value to:
false

You're done. Enjoy!

Thursday, June 19, 2008

Google Toolbar for Firefox 3.

Finally, it's here! Get yours from:
http://www.google.com/tools/firefox/toolbar/FT3/intl/en/index.html

Enjoy!

Saturday, April 5, 2008

Camel Caps Title and Artist in iTunes

I DON'T LIKE ALL CAPS LIKE THIS. I prefer my music titles to: "Use Camel Caps". And I'm tired to renaming each of the 1000 Top Songs Of The 80's. Here is my solution:

1) Save the snippet below into: MarkyCamelCapsSelectedSongs.js


// m_a_r_k_y@yahoo.com 2008-04-05 Initial

var iTunesApp = WScript.CreateObject("iTunes.Application");
var selectedTracks = iTunesApp.SelectedTracks;
var numTracks = selectedTracks.Count;
var ITTrackKindFile = 1;

while (numTracks > 0) {
var currTrack = selectedTracks .Item(numTracks);
// is this a file track?
if (currTrack.Kind == ITTrackKindFile) {
title = currTrack.Name;
artist = currTrack.Artist;

//WScript.Echo(convertToCamelCaps(title) + " : " + convertToCamelCaps(artist));

currTrack.Name = convertToCamelCaps(currTrack.Name);
currTrack.Artist = convertToCamelCaps(currTrack.Artist);

}
numTracks--;
}

// camelcaps string converter
function convertToCamelCaps(str) {
var tempArray = str.split(' ');

for (var i = 0; i < tempArray.length; i++) {
tempArray[i] = tempArray[i].charAt(0).toUpperCase() + tempArray[i].substring(1).toLowerCase();
}

return tempArray.join(' ');
}


2) Open iTunes and select the songs you want to convert.
3) Double click MarkyCamelCapsSelectedSongs.js from explorer to run it.

You should see your selected songs get converted.

More Info here:
http://developer.apple.com/sdk/
http://www.nsc.ru/docs/ms/js/jstoc.htm
http://www.asp.dk/docs/jscript/jstutor.htm

Enjoy!

Monday, March 31, 2008

Preserve MP3 Ratings across Windows Media Player (WMP) and Windows Explorer

This is how to preserve your MP3 ratings across Windows Media Player and Windows Explorer.

Step1: Add your MP3's into you library and add Star Ratings.
WMP Screenshot #1

Step2: Check "Maintain my star ratings as global ratings in files" in Preferences.
WMP Screenshot #2

Step3: Tools->Apply Media Information Changes.
WMP Screenshot #3

Step4: Look at your files in Windows Explorer.
WMP Screenshot #4

I hope this helps. Enjoy!

Wednesday, March 26, 2008

Color Management in Windows Vista

Here is a configuration that gives consistent colors in:
* Canon Digital Photo Professional
* Adobe Lightoom
* Adobe Photoshop CS2.
* Firefox 3 (new)

I'm not sure if it's all correct. But its something that seems to work for me.

Procedure:

Step 1: Disable Adobe Gamma Loader.
msconfig.exeAdobe Gamma


Step 2:
Run Windows "Color Management" application.
Color Management

Set the System Default by going to the "Advanced" tab, and clicking "Change System Default". Then set the following settings below.

System Default Tab 2

System Default Tab 1

System Default Tab 3


Step 3: Set the user color management.

System Default Tab 2

System Default Tab 1

System Default Tab 3


To enable color management in Firefox 3, see my other post
How to enable color profiles & color management in Firefox 3


I hope this helps! Let me know if you other suggestions.

Thanks! Enjoy!

Tuesday, March 25, 2008

Overclock the Q6600 on P5K-E Wifi/AP and Corsair DDR2 800

Hardware:
CPU: Q6600 2.4Ghz
Memory: AData 2x1GB DDR2, Corsair 2x2GB DDR2 5-5-5-15
Motherboard: Asus P5K-E Wifi/AP
CPU Cooler: Coolermaster Hyper TX 775

Max overclock achieved:
3.2GHz
CPU Multiplier: 8x
FSB: 356MHz
DRAM freq: 800MHz
Problem: System hit 75ÂșC as soon as I started the test.

Safe overclock:
2.6GHz
CPU Multiplier: 9x
FSB: 288MHz
FSB strap to north bridge: 266MHz
DRAM freq: 864MHz


overclocksmall

For the best article I found for overclocking, click here.

Tuesday, January 15, 2008

A better defrag program for Windows Vista

Ok, so you're not too happy about the new disk defragmenter that comes with Vista.

Well, try this for a change.You can download it from www.auslogics.com.

It gives you a better view of what is happening while it's running. And it seems to do a decent job. Finally, the best thing is, its absolutely FREE!

Enjoy!

Saturday, January 5, 2008

How to Change or Add Nero 8 Serial Number

If Nero complains that you have a pirated serial number (which is probably correct), do the following:

Delete the file called NeroPatentActivation.exe from "C:\Program Files\Common Files\Nero\Shared\NL3".

Open Nero Control Center by clicking:
Start->All Programs->Nero 8->Nero Toolkit->Nero ControlCenter
NeroControlCenter

Click on Updates tab on the left panel. Uncheck the box that says: "Check for updates every: XXX days"


Click on License tab on the left panel. Then click on Add and add your serial numbers.

NeroAdd

Your Nero 8 should now work and be activated permanently.

If this works for you, or if I missed a step, please let me know thanks!

Enjoy!

Friday, December 7, 2007

Image Resize Software.

I've been looking around for a good image resizing application. This seems to have good reviews. And apparently it works for Canon Raw (.CR2) files as well. I'm giving it a try.

Click here to visit the website.

By the way, did I mention it's free?