Showing posts with label heli. Show all posts
Showing posts with label heli. Show all posts
Tuesday, May 19, 2009


Blade 400 RC Heli Accident
I was trying to solve a problem with my gyro and tail servo. So, I decided to overhaul the heli. Unfortunately, I may not have secured the feathering shaft tight enough. The head assembly pretty much exploded in front of me and sent the blades flying at me at around 2000 RPM. Luckily, I was just about to land it, so it was very low. This could have been much worse! Phew! =)


Sunday, April 5, 2009
Trick to learning nose in hover on mode 2 transmitter.
Here's a trick I came up with when I was learning to hover nose-in: "Just follow the heli with your stick."

Confused? Here's the explanation. Start with a tail in hover, then just rotate it into the nose in position. The objective is to keep the heli perfectly still in front of you in this position. If it starts to drift towards you, it means the nose is dipping. The correct counter for that is to pull down on the elevator stick to make it move back (in this case away from you). The reverse is the same. If it starts to drift backwards away from you, it means the tail is dipping. The counter for that is to push the nose down by pushing the elevator forward to make the heli move forward (in this case towards you.) Got the logic? The same applies to the left and right.
So, basically, the counter for any drift is to follow the heli with your stick. It's the same even if you have to apply it diagonally. I know it's counter-intuitive at first, but if you just follow the rules, you'll get a comfortable hover in no time.
After a while, it all becomes automatic to you and you won't need to use this trick anymore. But in the mean time, for those who are just starting, I hope this helps. Good luck! Let me know how it goes. =)

Confused? Here's the explanation. Start with a tail in hover, then just rotate it into the nose in position. The objective is to keep the heli perfectly still in front of you in this position. If it starts to drift towards you, it means the nose is dipping. The correct counter for that is to pull down on the elevator stick to make it move back (in this case away from you). The reverse is the same. If it starts to drift backwards away from you, it means the tail is dipping. The counter for that is to push the nose down by pushing the elevator forward to make the heli move forward (in this case towards you.) Got the logic? The same applies to the left and right.
So, basically, the counter for any drift is to follow the heli with your stick. It's the same even if you have to apply it diagonally. I know it's counter-intuitive at first, but if you just follow the rules, you'll get a comfortable hover in no time.
After a while, it all becomes automatic to you and you won't need to use this trick anymore. But in the mean time, for those who are just starting, I hope this helps. Good luck! Let me know how it goes. =)
Friday, April 3, 2009
Blade 400 DX6i Binding Instructions
Start with both transmitter and receiver turned off.
1) Attach bind plug to Rx (heli)
2) Turn on the Rx (heli)
--> Light blinking means bind mode.
3) Move sticks & switches to fail-safe positions (Transmitter)
4) Hold the bind button while turning on the transmitter.
--> Tx & Rx should bind after a few seconds. Light on Rx will be solid.
5) Remove the bind plug (heli)
Power off and back on if you want.
1) Attach bind plug to Rx (heli)
2) Turn on the Rx (heli)
--> Light blinking means bind mode.
3) Move sticks & switches to fail-safe positions (Transmitter)
4) Hold the bind button while turning on the transmitter.
--> Tx & Rx should bind after a few seconds. Light on Rx will be solid.
5) Remove the bind plug (heli)
Power off and back on if you want.
Monday, March 2, 2009
Blade 400 ESC cut-off too early
I hit this problem earlier using the factory setup of the blade 400. It took me a few batteries to figure out what was happening. Here are the symptoms, cause, and the solutions. Please note, this was only for my particular case. But it might be what is happening to yours too.
Symptoms:
1) ESC cuts off at around 2 minutes.
2) Battery still half full according to charger.
Cause:
There's actually another symptom: ESC is very hot. As it turned out, my ESC was cutting off because it was too hot.
Solutions:
1) Mount ESC on the side for better ventilation. I think this helped, but this alone didn't really solve the problem.


2) Reduce the drain from the motor. This was a combination of adjusting the throttle curve and the pitch curve. Please see my post about the setup here: E-Flite Blade 400 Beginner Setup for Hovering and Slow Forward Flight. (16 minutes of flight time!)
With the two solutions above. I have no problems with early cut-off anymore.
Other options you can try:
1) Fly without the canopy.
2) Replace the stock 25A ESC with one with higher rating. e.g. 35A
I hope this helps. Enjoy!
Symptoms:
1) ESC cuts off at around 2 minutes.
2) Battery still half full according to charger.
Cause:
There's actually another symptom: ESC is very hot. As it turned out, my ESC was cutting off because it was too hot.
Solutions:
1) Mount ESC on the side for better ventilation. I think this helped, but this alone didn't really solve the problem.


2) Reduce the drain from the motor. This was a combination of adjusting the throttle curve and the pitch curve. Please see my post about the setup here: E-Flite Blade 400 Beginner Setup for Hovering and Slow Forward Flight. (16 minutes of flight time!)
With the two solutions above. I have no problems with early cut-off anymore.
Other options you can try:
1) Fly without the canopy.
2) Replace the stock 25A ESC with one with higher rating. e.g. 35A
I hope this helps. Enjoy!
E-Flite Blade 400 - From A-to-B, Turn! Faster! ...Ahhhh! Crash!
I've started getting bored with just hovering. So, this week I decided to attempt a little forward flight. Slowly at first but gradually getting faster. A feathering shaft, a pair of main blades, a main blade holder, and a horizontal tail fin holder later, I was starting to get the hang of it. Or so I thought...
E-Flite Blade 400 - Learning Forward Flight & Left Hand Pivots
Somehow, I find it more difficult to pivot counter-clockwise than clockwise. I'm really sure why. I think it has to do with the main rotor turning clockwise, and the tail rotor countering the torque. Hopefully, when I return to the faster head speed setup, it will more stable. Anyway, here's me practicing some forward flight and left hand pivots.
Wednesday, February 25, 2009
E-Flite Blade 400 Beginner Setup for Hovering and Slow Forward Flight. (16 minutes of flight time!)
The following setup is a result of reading forums and a lot of my own experimentation. I recommend it for anyone who is learning to hover or learning slow forward flight. I recommend it be used for indoor flying only or outdoor on a very still day.
Mechanical Setup
I basically use the factory setup of the Blade 400. I currently use fiberglass blades. But I get the same results with the wooden blades. The only difference I can think of is lubrication.
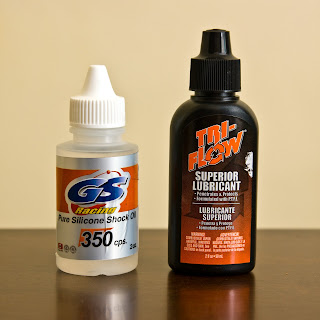
For the belt, I use RC car shock oil. This was suggested in one of the forums. It's a bit messy sometimes, and I'm not really that sure if it helps, but I put it on my belt every dozen or so flights. The other recommended option is silicone spray.
The next (not so) secret ingredient is Triflow. This definitely helps. I put it on all moving parts. The head setup, tail rotor, everything! It just works beautifully. It makes everything slide nice and smooth. It costs about AUD $8 for 2 fl oz. If you can't find this in your local hobby shop, try the bike shops. That's where I got mine.
DX6i Throttle Curve
I've decided to use F-mode for all my custom settings. This way, I can test how my settings compare against the default factory normal mode settings. Later, when I start doing 3D flying, I might swap them over completely.
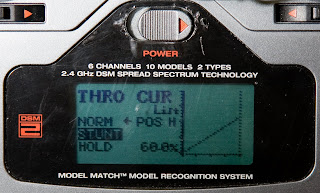
I use a linear curve from 0 to 60%.
That is:
Position L = 0%
Position 2 = 15%
Position 3 = 30%
Position 4 = 45%
Position H = 60%
The rationale is that the slower the head speed, the less power it will consume. Now, I've read in the forums that the motor runs most efficiently at 80% throttle. But I found this not to be the case on mine. I tried running a linear curve to 100% and 80%. Both gave me less flying time. I also tried running lower at 50%. But that barely got it off the ground. And it looked like the motor was being burdened too much by the pitch.
With the 60% linear curve, it will allow you to hover at 1 line above mid-stick. Which I think is the ideal position in preparation for 3D flying.
DX6i Pitch Curve
I got the idea from one of the forums. But I added my own little adjustments. I am using the following settings:
Position L = 35%
Position 2 = 55%
Position 3 = 70%
Position 4 = 85%
Position H = 100%
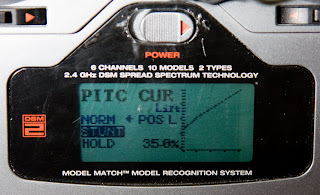
The almost exponential-looking curve for 2,3,4,H, give you a very forgiving throttle/pitch response around mid-stick. With these values, you're sure the heli won't jump up or drop down even if you over-correct slightly. The lower Position L is my own addition. It gives you the negative pitch you need when you want to get the heli quickly to the ground. I didn't originally have this setting but found that during "emergencies" the heli just won't go down quick enough. With this, you still have good panic response. =)
DX6i Dual Rates and Expo
Again, I use F-mode for my custom settings. So, remember to turn on the switches when you program these in:
AILE 100% +10%
ELEV 100% +10%
RUDD 100% INH
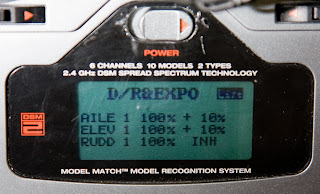
The +10% expo makes the cyclics a bit more forgiving around the neutral position. At first, I didn't like these settings. Because the response felt delayed. I even tried negative expo. However, I found myself over-controlling too much. The heli didn't fly very nicely. With these settings it makes the heli fly like I'm in control. =)
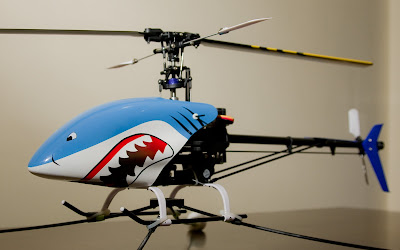
Well that's about it. Use the settings above, and you should get anything between 12 and 16 minutes of flying time. Remember to only use these indoor or outside on a windless day. Otherwise, the heli will just be too underpowered to be controllable in the wind. If you have any comments or suggestions, please feel free to leave me a message. I hope it helps. Enjoy!
Mechanical Setup
I basically use the factory setup of the Blade 400. I currently use fiberglass blades. But I get the same results with the wooden blades. The only difference I can think of is lubrication.

For the belt, I use RC car shock oil. This was suggested in one of the forums. It's a bit messy sometimes, and I'm not really that sure if it helps, but I put it on my belt every dozen or so flights. The other recommended option is silicone spray.
The next (not so) secret ingredient is Triflow. This definitely helps. I put it on all moving parts. The head setup, tail rotor, everything! It just works beautifully. It makes everything slide nice and smooth. It costs about AUD $8 for 2 fl oz. If you can't find this in your local hobby shop, try the bike shops. That's where I got mine.
DX6i Throttle Curve
I've decided to use F-mode for all my custom settings. This way, I can test how my settings compare against the default factory normal mode settings. Later, when I start doing 3D flying, I might swap them over completely.

I use a linear curve from 0 to 60%.
That is:
Position L = 0%
Position 2 = 15%
Position 3 = 30%
Position 4 = 45%
Position H = 60%
The rationale is that the slower the head speed, the less power it will consume. Now, I've read in the forums that the motor runs most efficiently at 80% throttle. But I found this not to be the case on mine. I tried running a linear curve to 100% and 80%. Both gave me less flying time. I also tried running lower at 50%. But that barely got it off the ground. And it looked like the motor was being burdened too much by the pitch.
With the 60% linear curve, it will allow you to hover at 1 line above mid-stick. Which I think is the ideal position in preparation for 3D flying.
DX6i Pitch Curve
I got the idea from one of the forums. But I added my own little adjustments. I am using the following settings:
Position L = 35%
Position 2 = 55%
Position 3 = 70%
Position 4 = 85%
Position H = 100%

The almost exponential-looking curve for 2,3,4,H, give you a very forgiving throttle/pitch response around mid-stick. With these values, you're sure the heli won't jump up or drop down even if you over-correct slightly. The lower Position L is my own addition. It gives you the negative pitch you need when you want to get the heli quickly to the ground. I didn't originally have this setting but found that during "emergencies" the heli just won't go down quick enough. With this, you still have good panic response. =)
DX6i Dual Rates and Expo
Again, I use F-mode for my custom settings. So, remember to turn on the switches when you program these in:
AILE 100% +10%
ELEV 100% +10%
RUDD 100% INH

The +10% expo makes the cyclics a bit more forgiving around the neutral position. At first, I didn't like these settings. Because the response felt delayed. I even tried negative expo. However, I found myself over-controlling too much. The heli didn't fly very nicely. With these settings it makes the heli fly like I'm in control. =)

Well that's about it. Use the settings above, and you should get anything between 12 and 16 minutes of flying time. Remember to only use these indoor or outside on a windless day. Otherwise, the heli will just be too underpowered to be controllable in the wind. If you have any comments or suggestions, please feel free to leave me a message. I hope it helps. Enjoy!
Tuesday, February 24, 2009
E-Sky Lama V3 Flexible Tail
The original tail is probably the most fragile part of the Lama V3. It broke on my very first flight (ahem, first crash, I should say). For the longest time, I've been repairing it with super glue. However, I think it has more glue than original plastic now. A few weeks ago, it just completely broke.

Then I discovered the Xtreme Flexible tail. I ordered it on ebay for AUD $25 + shipping. And it hasn't broken since. It's probably the best upgrade you can get for this heli.

Grab yourself one. Highly recommended. Enjoy!

Then I discovered the Xtreme Flexible tail. I ordered it on ebay for AUD $25 + shipping. And it hasn't broken since. It's probably the best upgrade you can get for this heli.

Grab yourself one. Highly recommended. Enjoy!
Monday, February 9, 2009
Subscribe to:
Posts (Atom)