Monday, August 31, 2009

The best iPhone bike mount

I recently (re)started on a new hobby: road biking. And given that I never go anywhere without my iPhone, of course I had to find a way to make most use of it on my bike.

I've been trying for days to find a decent bike mount (on ebay) but couldn't find one. So, I decided to make my own.

Components:
1) Broken iPhone leather case - Broke the top frame while pulling it out of my pocket. Happy I decided to keep it for a while.
2) Zip ties
3) (Optional) 1 cm diameter tube. I got this from a broken RC heli tail boom.


Tools:
1) Cutting knife
2) (Optional) Drill. I used a dremel rotary tool.

Steps:
1) Cut two holes into leather case. The distance between the holes should be the same as the width of your bike stem (one that attaches your handle bar).
2) (Optional) Cut the tube to your preferred length. Drill two holes of the same distance as your holes on the iPhone case.
3) Put it all together with zip ties.

Result:
(Click on pictures to enlarge.)


Hehehe! All of this from junk parts. Not bad eh?

Note:
Was worried it would still pop out, so I wrapped 1 rubber band around it. But, it may have been fine without it. Got 50 km with it on road and rough without any problems.

Enjoy!

Saturday, August 29, 2009

How to fix mouse not working after hibernate (USB device not recognized) on Windows 7

I've been having this problem since Vista. And, it's still happening on Windows 7. So, I decided to search around to find a solution. Here is the combined solution that worked for me:

1) Start Device Manager. This can be done (1) by right-clicking on My Computer and selecting Manage. Or (2) clicking the Start menu and typing device manager. Or (3) other ways.

2) Expand the Universal Serial Bus Controllers node.


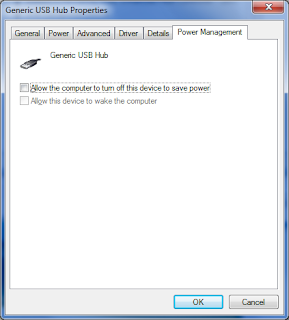
3) For each instances of Generic USB Hub and USB Root Hub, right-click and go to Power Management tab.


4) Uncheck the option: Allow the computer to turn off this device to save power.

5) Repeat for ALL instances of Generic USB Hub and USB Root Hub.

6) Then, refresh everything by right-clicking and selecting Scan for Hardware Changes. Now, double-check all nodes you've changed and see if any has reverted back to the previous settings. On mine, one of the nodes kept resetting the power management. If this happens, just uncheck the box again and repeat the refresh until it sticks.

7) Retry sleeping or hibernating. It should now resume properly.


If that still doesn't work, you need to change some registry keys.

1) Open regedit. This can be done by clicking Start and typing regedit.

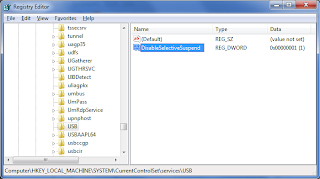
2) Navigate to HKEY_LOCAL_MACHINE\SYSTEM\CurrentControlSet\Services.

3) Add new key with name: USB

4) Add new DWORD Value. Name it: DisableSelectiveSuspend with value of 1.


5) Exit the registry editor.

6) Now try it again.

I hope this helps! Enjoy!

How to change location of special folders (My Documents, My Pictures, My Music, etc.) on Windows 7

Since the Windows 95 day, I've learned the habit of saving my profile data on a drive separate from the where the system is installed. This allows me to completely blow away (reformat) the OS without having to save my data everytime.

On Windows 7 (and Vista, if I remember correctly), this is made even simpler. Simply go to you profile folder where you see your special folders (My Documents, My Pictures, My Music, etc.).


Now, right-click on one of them and go to the location tab.

Browse to you new preferred location, and select Move.


You may have been prompted to merge the contents of you special folder. If you selected no, you may find that you will not have duplicate special folders. That's fine. Simply delete the one that points to the old one (the one on the system drive).

I hope this helps. Enjoy!

Thursday, August 27, 2009

How to remove/disable floppy drive on Windows 7

I don't think I've seen a physical floppy drive in years! But my system seems to still support it and even show it to me in the explorer window. Well, if you want to get rid if it, just follow the procedure below:

1) Open Device Manager. You can do this by clicking the start menu and typing device manager or by starting up devmgmt.msc.

2) Under your computer's name, look for the category named Floppy disk drives.

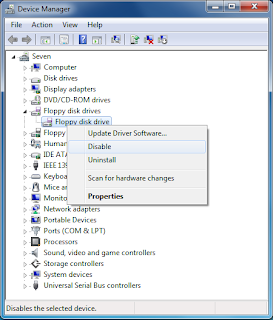
3) Right-click on the Floppy disk drive, and select disable.


That's it! You're done. No more annoying waits if you accidentally click it. And no more waste of screen real estate. Enjoy!

References:
  • reference 1
  • Saturday, August 1, 2009

    Enable emoticons (emoji) on iPhone 3.0


    Do you want to be able to send emoticons to your iPhone buddies? Here's how:

    1) Go to the App Store and look for the free app called: Spell Number.

    2) Start Spell Number and type the number blow, the hit return a few times. You can then close the application.


    3) Go to Settings->General->Keyboard, scroll down to Japanese, and enable Emoji.


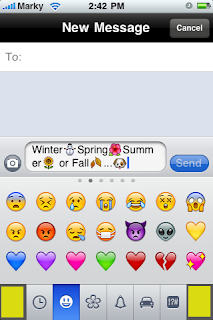
    4) Now, go ahead and start typing. You can switch back and forth between your keyboards by pressing the internationalization button (Globe).


    If you have a Jailbroken iPhone, you may encounter some missing buttons like below. The left one is for switching, the right is the backspace key. They do work, but, no button is shown.


    Enjoy!

    References:
  • http://limitededitioniphone.com/emoji-activate-on-221-and-30-free/