I know the session restore is a very useful feature. And a lot of people actually rely on it. But I find a bit annoying that it has to prompt me every time I start firefox.
I read somewhere that it is actually a bug in that firefox cannot distinguish between a machine shutdown and a crash. It thinks it crashed, an so prompts you if you want to continue off with the previously open windows that you had.
Anyway, until they get this fixed, I'm turning it off. Here's how to do it:
1) Open firefox and type the following in your address bar:
about:config
2) Right-click, and select:
New -> Boolean
3) In the dialog box, type the line below and press ok.
browser.sessionstore.resume_session
4) Set the value to:
false
You're done. Enjoy!
Saturday, June 28, 2008
Monday, June 23, 2008
Use Winkey-E to start File Manager (Nautilus) on Ubuntu 8.04
I'm used to hittig Winkey-E to bring up Explorer on Windows. So, I want to have a similar key binding on Ubuntu. Here's how I did it:
Step 1: Disable current key binding of Winkey-E.
System->Preferences->Advanced Desktop Effects Settings
Go to Desktop->Expo->Bindings
Click on Super-E and disable it.
Step2: Add new bindings
prompt%> gconf-editor
Go to /Apps/metacity/global_keybidings
Set run_command_1 to < super >E (without any space)
Go to /Apps/metacity/keybinding_commands
Set command_1 to /usr/bin/nautilus
You're done. Enjoy!
Friday, June 20, 2008
killps - Pipe /bin/ps to /bin/kill
Have you ever wanted to kill a bunch of processes? Here is how to do it:
1) Put this in your .bashrc
2) Here's how to use it:
2.A) Search for the processes. Make sure you only see what you want to kill.
e.g.:
prompt%> ps -ef | grep program_name
e.g.:
ps -ef | grep username | grep program_name | grep -v grep
2.B) When you'r happy with the filter, pipe it to killps
e.g.:
prompt%> ps -ef | grep program_name | killps
e.g.:
ps -ef | grep username | grep program_name | grep -v grep | killps
Enjoy!
1) Put this in your .bashrc
# Killps - Marky 2008-06-20
# usage: ps -ef | grep progname | killps
alias killps="awk '// { print \$2 }'  | xargs kill"
2) Here's how to use it:
2.A) Search for the processes. Make sure you only see what you want to kill.
e.g.:
prompt%> ps -ef | grep program_name
e.g.:
ps -ef | grep username | grep program_name | grep -v grep
2.B) When you'r happy with the filter, pipe it to killps
e.g.:
prompt%> ps -ef | grep program_name | killps
e.g.:
ps -ef | grep username | grep program_name | grep -v grep | killps
Enjoy!
Thursday, June 19, 2008
Google Toolbar for Firefox 3.
Finally, it's here! Get yours from:
http://www.google.com/tools/firefox/toolbar/FT3/intl/en/index.html
Enjoy!
http://www.google.com/tools/firefox/toolbar/FT3/intl/en/index.html
Enjoy!
Wednesday, June 18, 2008
How to fix weird characters in aterm (for viewing man pages)
If your aterm is showing you weird boxes when viewing man pages, just put the following in your .bashrc:
# Fix weird characters in aterm
export LANG=C
Enjoy!
# Fix weird characters in aterm
export LANG=C
Enjoy!
How to autostart emerald
There seem to be at least two ways to do this:
1) Add the following command to sessions:
emerald --replace &
2) Replace the following line in /usr/bin/compiz-decorator
from:
USE_EMERALD="no"
to
USE_EMERALD="yes"
Then, restart X server.
Enjoy!
1) Add the following command to sessions:
emerald --replace &
2) Replace the following line in /usr/bin/compiz-decorator
from:
USE_EMERALD="no"
to
USE_EMERALD="yes"
Then, restart X server.
Enjoy!
Sunday, June 15, 2008
Auto-complete hostnames with using bash
Having forever used tcsh, this is something new I discovered when I switched to bash.
Here's how it works:
prompt%>ssh my
becomes:
prompt%>ssh mypc.homelinux.org
Here's how to set it up:
1) Create a file similar to /etc/hosts
e.g: (/home/marke/hostfile)
* note: you don't really seem to need the real IP address. Just the name. You ca even shorten it if you have resolver set correctly.
2) Add the following to your .bashrc
Yor're done!
Enjoy!
For more info:
* man bash
* link
Here's how it works:
prompt%>ssh my
becomes:
prompt%>ssh mypc.homelinux.org
Here's how to set it up:
1) Create a file similar to /etc/hosts
e.g: (/home/marke/hostfile)
---snip---
# Local PC
127.0.0.1 localhost
127.0.1.1 mypc.homelinux.org
# Other
0.0.0.0 laptop1.homelinux.org
0.0.0.0 laptop2.homelinux.org
---snip---
* note: you don't really seem to need the real IP address. Just the name. You ca even shorten it if you have resolver set correctly.
2) Add the following to your .bashrc
export HOSTFILE="/home/marke/hostfile"
Yor're done!
Enjoy!
For more info:
* man bash
* link
How to disable tilde expansion on bash, Ubuntu 8.04 (hardy)
This is how to prevent bash from replacing "~" with "/home/" when you auto-complete using .
1) Edit .bashrc
prompt%> cd
prompt%> vi .bashrc
2) Add the following lines:
3) Try it out on a new terminal
For those interested, see: /etc/bash_completion Look for "tilde".
References:
* http://www.linuxquestions.org/questions/linux-software-2/how-to-stop-bash-from-replacing-with-homeusername-643162/
1) Edit .bashrc
prompt%> cd
prompt%> vi .bashrc
2) Add the following lines:
# Disable Tilde Expansion
_expand()
{
    return 0;
}
3) Try it out on a new terminal
For those interested, see: /etc/bash_completion Look for "tilde".
References:
* http://www.linuxquestions.org/questions/linux-software-2/how-to-stop-bash-from-replacing-with-homeusername-643162/
Saturday, June 14, 2008
Ubuntu standard hotkeys I always forget
Actually, I only wanted to note down one. "Activate window menu". The hotkey for it is: ALT + Space. You then have access to the move command. This is particularly useful when your window just happens to slide under the menubar like this:

Update:
Alt-F7 Move Window
I'll add to this post as I forget & remember more hotkeys. :)
Enjoy!
References:
* http://vntutor.wordpress.com/2007/05/23/useful-hotkeys-in-ubuntu/

Update:
Alt-F7 Move Window
I'll add to this post as I forget & remember more hotkeys. :)
Enjoy!
References:
* http://vntutor.wordpress.com/2007/05/23/useful-hotkeys-in-ubuntu/
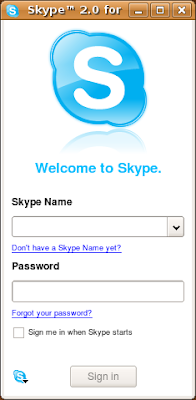
How to setup Skype on Ubuntu 8.04 Hardy on Asus P5K-E Wifi/AP
It took me some time to get this working. So I'm writing it down so I can go back to it in case I have to do it again. Here's how I got mine to work:
1) Edit sources.list
prompt%> sudo vi /etc/apt/sources.list
2) Add the following line:
deb http://download.skype.com/linux/repos/debian/ stable non-free
3) Update & install skype
prompt%> sudo apt-get update
prompt%> sudo apt-get install skype
4) If you encounter problems with libraries, do the following:
prompt%> sudo apt-get install -f
5) Run skype
prompt%> skype &

Now, the more difficult part is getting the mic to work. (Assuming you have no problems with audio playback). Luckily here are the tricks:
1) Go to System->Preferences->Sound. In the Devices tab->Sound Capture, select ALSA.

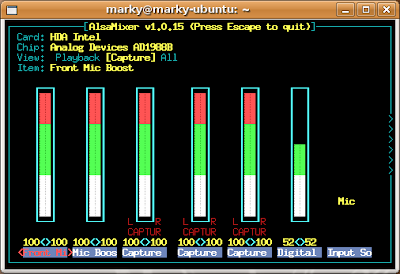
2) Open up a terminal, type the following:
prompt5> alsamixer -V capture
Now, make sure all Captures are set to CAPTUR. You can set/unset using the space key. Make sure input source is set to mic. Press ESC to quit.

3) Try recording from your mic using Applications->Sound & Video-> Sound Recorder. If that now works, you're looking good.
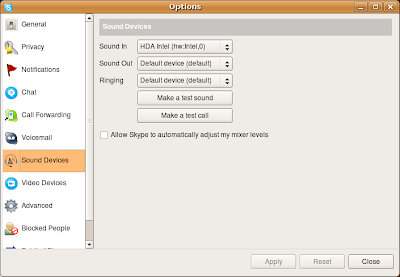
4) In Skype, go to Options->Sound Devices->Sound In. Select HDA Intel (hw:Intel,0)
5) In the same tab, uncheck Allow Skype to automatically adjust my mixer levels.

6) Now, try calling Echo123 (Sound Test Service)
Enjoy!
References:
* http://technical-itch.co.uk/2007/09/18/how-to-install-skype-on-ubuntu/
* http://forum.skype.com/index.php?showtopic=66544
* http://forum.skype.com/index.php?showtopic=126561&st=0&p=575491&#entry575491
* http://srimal-techdiary.blogspot.com/2008/05/using-mic-with-skype-2-on-ubuntu-8.html
1) Edit sources.list
prompt%> sudo vi /etc/apt/sources.list
2) Add the following line:
deb http://download.skype.com/linux/repos/debian/ stable non-free
3) Update & install skype
prompt%> sudo apt-get update
prompt%> sudo apt-get install skype
4) If you encounter problems with libraries, do the following:
prompt%> sudo apt-get install -f
5) Run skype
prompt%> skype &

Now, the more difficult part is getting the mic to work. (Assuming you have no problems with audio playback). Luckily here are the tricks:
1) Go to System->Preferences->Sound. In the Devices tab->Sound Capture, select ALSA.

2) Open up a terminal, type the following:
prompt5> alsamixer -V capture
Now, make sure all Captures are set to CAPTUR. You can set/unset using the space key. Make sure input source is set to mic. Press ESC to quit.

3) Try recording from your mic using Applications->Sound & Video-> Sound Recorder. If that now works, you're looking good.
4) In Skype, go to Options->Sound Devices->Sound In. Select HDA Intel (hw:Intel,0)
5) In the same tab, uncheck Allow Skype to automatically adjust my mixer levels.

6) Now, try calling Echo123 (Sound Test Service)
Enjoy!
References:
* http://technical-itch.co.uk/2007/09/18/how-to-install-skype-on-ubuntu/
* http://forum.skype.com/index.php?showtopic=66544
* http://forum.skype.com/index.php?showtopic=126561&st=0&p=575491&#entry575491
* http://srimal-techdiary.blogspot.com/2008/05/using-mic-with-skype-2-on-ubuntu-8.html
Tuesday, June 10, 2008
Number pad / Numeric keypad not working in Ubuntu 8.04 (Hardy)
Sunday, June 8, 2008
CF Card Speeds
I hate it when you have to switch CF cards. It just always has to happen right when you're in middle of capturing those perfect frames. I think I need a slightly larger card. Perhaps 4GB or 8GB? Learning from experience, I also want a 120x or higher. 80x is just too slow. Below is my quick reference guide to CF card speeds.

References:
* http://en.wikipedia.org/wiki/CD-ROM#Transfer_rates
* My flickr pics here.
| Transfer Speed: | MB/sec: |
| 1x | 0.15 |
| 20x | 3 |
| 80x | 12 |
| 100x | 15 |
| 120x | 18 |
| 133x | 19.95 |
| 150x | 22.5 |
| 200x | 30 |
| 300x | 45 |
| 400x | 60 |
| 500x | 75 |

References:
* http://en.wikipedia.org/wiki/CD-ROM#Transfer_rates
* My flickr pics here.
Friday, June 6, 2008
The best remote access system for Ubuntu 8.04 (hardy)
What is the fastest VNC server? What is the most responsive VNC client? Can I just forward X directly? Which is the most secure? - These are the questions I needed to get answers to quickly as migrated my development environment from XP to Linux.
The first obvious thing to try, of course, was directly forwarding X. That was just too slow. Next was VNC. I tried tightvnc, realvnc, vino, etc. The only usable setting I found was 8-bit colour and using Hextile encodig. However, it wasn't very enjoyable.
Then I discovered FreeNX. It's fast, secure, stable, user-friendly, and very pleasing to the eye. Here's how to set it up on Ubuntu 8.04.
Server Setup:
------------------------
Step1: Update your current installation
prompt%> sudo apt-get update && sudo apt-get upgrade
Step2: Add the repository for th NX packages & get them
prompt%> sudo vi /etc/apt/sources.list
Add the following lines:
deb http://ppa.launchpad.net/marceloshima/ubuntu hardy main
deb-src http://ppa.launchpad.net/marceloshima/ubuntu hardy main
Install:
prompt%> sudo apt-get install expect openssh-server nxlibs nxagent nxproxy freenx-server
Step3: Add your account
prompt%> sudo /usr/bin/nxserver --useradd < username > --system --administrator
Step4: Startup the NX server
prompt%> sudo /usr/bin/nxserver --start or --stop or --restart
Client setup
------------------------
Step1: Download the client
prompt%> wget http://64.34.161.181/download/3.2.0/Linux/nxclient_3.2.0-9_i386.deb
Step2: Install it
prompt%> sudo dpkg -i nxclient_3.2.0-9_i386.deb
If you are using a windows machine, you can get a client from here:
http://64.34.161.181/download/3.2.0/Windows/nxclient-3.2.0-10.exe
Step3: Run the client
prompt%> /usr/NX/bin/nxclient
Enjoy!

Update 2008-06-26:
For AMD64, its just about the same:
1) Get SSHD:
prmpt%> sudo apt-get install openssh-server
2) Get 3 packages from here.
3) Install:
prompt%> sudo dpkg -i nxclient_3.2.0-9_x86_64.deb
prompt%> sudo dpkg -i nxnode_3.2.0-11_x86_64.deb
prompt%> sudo dpkg -i nxserver_3.2.0-13_x86_64.deb
4) Start server
/usr/NX/bin/nxserver --status|--start|--stop|--restart
Enjoy!
References:
http://www.drtek.ca/freenx-server-ubuntu-hardy
The first obvious thing to try, of course, was directly forwarding X. That was just too slow. Next was VNC. I tried tightvnc, realvnc, vino, etc. The only usable setting I found was 8-bit colour and using Hextile encodig. However, it wasn't very enjoyable.
Then I discovered FreeNX. It's fast, secure, stable, user-friendly, and very pleasing to the eye. Here's how to set it up on Ubuntu 8.04.
Server Setup:
------------------------
Step1: Update your current installation
prompt%> sudo apt-get update && sudo apt-get upgrade
Step2: Add the repository for th NX packages & get them
prompt%> sudo vi /etc/apt/sources.list
Add the following lines:
deb http://ppa.launchpad.net/marceloshima/ubuntu hardy main
deb-src http://ppa.launchpad.net/marceloshima/ubuntu hardy main
Install:
prompt%> sudo apt-get install expect openssh-server nxlibs nxagent nxproxy freenx-server
Step3: Add your account
prompt%> sudo /usr/bin/nxserver --useradd < username > --system --administrator
Step4: Startup the NX server
prompt%> sudo /usr/bin/nxserver --start or --stop or --restart
Client setup
------------------------
Step1: Download the client
prompt%> wget http://64.34.161.181/download/3.2.0/Linux/nxclient_3.2.0-9_i386.deb
Step2: Install it
prompt%> sudo dpkg -i nxclient_3.2.0-9_i386.deb
If you are using a windows machine, you can get a client from here:
http://64.34.161.181/download/3.2.0/Windows/nxclient-3.2.0-10.exe
Step3: Run the client
prompt%> /usr/NX/bin/nxclient
Enjoy!

Update 2008-06-26:
For AMD64, its just about the same:
1) Get SSHD:
prmpt%> sudo apt-get install openssh-server
2) Get 3 packages from here.
3) Install:
prompt%> sudo dpkg -i nxclient_3.2.0-9_x86_64.deb
prompt%> sudo dpkg -i nxnode_3.2.0-11_x86_64.deb
prompt%> sudo dpkg -i nxserver_3.2.0-13_x86_64.deb
4) Start server
/usr/NX/bin/nxserver --status|--start|--stop|--restart
Enjoy!
References:
http://www.drtek.ca/freenx-server-ubuntu-hardy
Thursday, June 5, 2008
How to view man pages in color
The solution is basically to set the PAGER environment variable to the program that supports color.
There are at least 5 you can choose from:
* /bin/more
* /usr/bin/pg
* /usr/bin/less
* /usr/bin/w3m
* /usr/bin/most
To get "most" on Ubuntu, do the following:
prompt%> sudo apt-get install most
prompt%> sudo update-alternatives --config pager
Enjoy!

There are at least 5 you can choose from:
* /bin/more
* /usr/bin/pg
* /usr/bin/less
* /usr/bin/w3m
* /usr/bin/most
To get "most" on Ubuntu, do the following:
prompt%> sudo apt-get install most
prompt%> sudo update-alternatives --config pager
Enjoy!

Wednesday, June 4, 2008
GDM Welcome Theme Tutorial
Step1: Download an existing theme.
You can get one from here: http://www.gnome-look.org/?xcontentmode=150
Step2: Make your own background and foreground images.
Step3: Edit the *.xml file and *.desktop and put in your images.
Step4: Get xnest and get screenshot
* prompt%> sudo apt-get install xnest
* prompt%> gdmflexiserver --xnest
Step5: Tar it all up.

References:
http://live.gnome.org/GnomeArt/Tutorials/GdmThemes
You can get one from here: http://www.gnome-look.org/?xcontentmode=150
Step2: Make your own background and foreground images.
Step3: Edit the *.xml file and *.desktop and put in your images.
Step4: Get xnest and get screenshot
* prompt%> sudo apt-get install xnest
* prompt%> gdmflexiserver --xnest
Step5: Tar it all up.

References:
http://live.gnome.org/GnomeArt/Tutorials/GdmThemes
Tuesday, June 3, 2008
Aptitude cheat sheet
Searching:
* apt-cache search ABC
* aptitude search ABC
Installing:
* sudo apt-get install ABC
* sudo aptitude install ABC
Showing version numbers:
* apt-cache show ABC
* aptitude show ABC
Uninstalling:
* sudo apt-get remove ABC
* sudo aptitude remove ABC
Removing configuration files as well:
* sudo apt-get remove --purge ABC
* sudo aptitude purge ABC
References:
* http://monkeyblog.org/ubuntu/installing/
How to install Firefox RC1 on Ubuntu Hardy (8.04)
Step1: System->Administration->software Sources
Step2: Add: deb http://ppa.launchpad.net/mozillateam/ubuntu hardy main universe
Step3: Press Close
Step4: Press Reload
Step5: prompt%> sudo apt-get update
Step2: Add: deb http://ppa.launchpad.net/mozillateam/ubuntu hardy main universe
Step3: Press Close
Step4: Press Reload
Step5: prompt%> sudo apt-get update
Subscribe to:
Comments (Atom)
