Showing posts with label windows 7. Show all posts

Sunday, March 5, 2017

Thinking about assembling a new PC after 10 years

Hello! It's been a long time.

I'm writing this blog post from the machine I assembled 10 years ago. It's still alive and kicking as it has had it's share of upgrades throughout the years. But it's time for me to build a new one! Yehey!

Here is my current setup:
  • Intel Q6600 2.4GHz Quad Core (Passively watercooled with a Zalman Reserator)
  • MSI P5K-E Wifi motherboard
  • 8GB DDR2 memory
  • GeForce GTX 680 video card (Passively watercooled with a Zalman Reserator. Yes! Two of them in separate loops.)
  • Seasonic X650 (I think) 80 Plus Gold PSU
  • Vertex 3 256GB SSD 
  • Dell U3011 monitor
What I use it for:
  • Facebook (Of course!)
  • Web browsing / Work - Since most of my work is mostly over the web.
  • Light gaming (ahem!... Diablo 3, Civilization, This War Of Mine, XCOM)
  • Photo editing with Adobe Lightroom
What I want to build my next machine for:
  • VR gaming with HTC Vive
  • 1 or virtual machines for experimenting
  • Basically the same as before
And so the hunt begins! Stay tuned. :)

Thursday, October 17, 2013

Cygwin commands execute really slow from commandline

Seems to be caused by evaluation of /cygdrive/. So, open network connections and disable the following:


Sunday, December 6, 2009

Show Desktop Quick Launch in Windows 7

Old habits die hard. I understand. So, for those who have gotten used to going to the bottom-left cornet of your desktop and clicking the "Show Desktop" quick launch icon for years, here is some help in your transition to Windows 7.

First of all, the new show desktop is now on the bottom-right corner of the screen. See screen cap below. Of course, I know that won't satisfy you. =) So keep reading.


If you want to get the old fashioned "Show Desktop" icon on the bottom-left, here are the instructions:

Step 1:
Using notepad, create a file named "desktop.scf" with the contents below:

[Shell]
Command=2
IconFile=explorer.exe,3
[Taskbar]
Command=ToggleDesktop

In the Save dialog, select "All Files (*.*)" as file type. Then, save it to: "C:\Users\%USERNAME%\AppData\Roaming\Microsoft\Internet Explorer\Quick Launch\User Pinned\TaskBar".

Step 2:
Duplicate a shortcut on your desktop. Just do this using copy-paste. (I'm using Zoom Browser on my example. But you can use any other program.) Go to the shortcut properties and change the comment, name, and icon to your preferred icon. (You can use explorer.exe for the desktop icon.) Now, pin the shortcut you just created onto the taskbar.


Step 3:
Right-click on your new launcher, then right-click again onto the icon itself and bring up its properties. On the shortcut tab, change the Target to desktop.scf you created in Step 1. Click OK, and your done!


I hope this helps. Enjoy!

References:
Link1

Saturday, August 29, 2009

How to fix mouse not working after hibernate (USB device not recognized) on Windows 7

I've been having this problem since Vista. And, it's still happening on Windows 7. So, I decided to search around to find a solution. Here is the combined solution that worked for me:

1) Start Device Manager. This can be done (1) by right-clicking on My Computer and selecting Manage. Or (2) clicking the Start menu and typing device manager. Or (3) other ways.

2) Expand the Universal Serial Bus Controllers node.


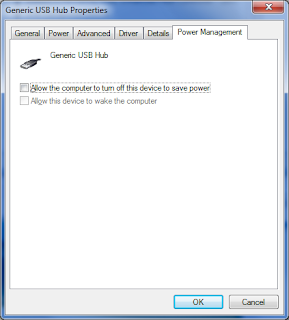
3) For each instances of Generic USB Hub and USB Root Hub, right-click and go to Power Management tab.


4) Uncheck the option: Allow the computer to turn off this device to save power.

5) Repeat for ALL instances of Generic USB Hub and USB Root Hub.

6) Then, refresh everything by right-clicking and selecting Scan for Hardware Changes. Now, double-check all nodes you've changed and see if any has reverted back to the previous settings. On mine, one of the nodes kept resetting the power management. If this happens, just uncheck the box again and repeat the refresh until it sticks.

7) Retry sleeping or hibernating. It should now resume properly.


If that still doesn't work, you need to change some registry keys.

1) Open regedit. This can be done by clicking Start and typing regedit.

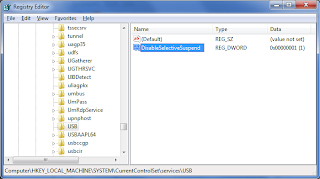
2) Navigate to HKEY_LOCAL_MACHINE\SYSTEM\CurrentControlSet\Services.

3) Add new key with name: USB

4) Add new DWORD Value. Name it: DisableSelectiveSuspend with value of 1.


5) Exit the registry editor.

6) Now try it again.

I hope this helps! Enjoy!

How to change location of special folders (My Documents, My Pictures, My Music, etc.) on Windows 7

Since the Windows 95 day, I've learned the habit of saving my profile data on a drive separate from the where the system is installed. This allows me to completely blow away (reformat) the OS without having to save my data everytime.

On Windows 7 (and Vista, if I remember correctly), this is made even simpler. Simply go to you profile folder where you see your special folders (My Documents, My Pictures, My Music, etc.).


Now, right-click on one of them and go to the location tab.

Browse to you new preferred location, and select Move.


You may have been prompted to merge the contents of you special folder. If you selected no, you may find that you will not have duplicate special folders. That's fine. Simply delete the one that points to the old one (the one on the system drive).

I hope this helps. Enjoy!

Thursday, August 27, 2009

How to remove/disable floppy drive on Windows 7

I don't think I've seen a physical floppy drive in years! But my system seems to still support it and even show it to me in the explorer window. Well, if you want to get rid if it, just follow the procedure below:

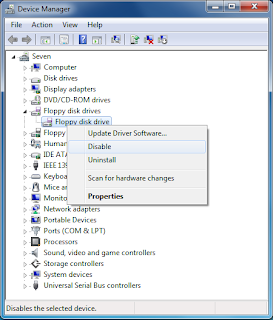
1) Open Device Manager. You can do this by clicking the start menu and typing device manager or by starting up devmgmt.msc.

2) Under your computer's name, look for the category named Floppy disk drives.

3) Right-click on the Floppy disk drive, and select disable.


That's it! You're done. No more annoying waits if you accidentally click it. And no more waste of screen real estate. Enjoy!

References:
  • reference 1